
Incus for Containers and VMs: A Powerful Proxmox Alternative? A Step-by-Step Guide to build a Cluster
Incus is a versatile and efficient tool for managing both system containers and virtual machines, offering a unified way to run full Linux systems. It supports a wide range of Linux distributions and relies on a simple but powerful REST API. Whether you’re running a single machine or scaling across a full data center, Incus adapts easily to your needs. It can transform your setup into something that feels like a lightweight private cloud, letting you run various workloads with optimized resource usage. If you’re looking for a cost-effective way to manage infrastructure, containerize environments, or deploy VMs, Incus is definitely worth considering.
Note: Sounds interesting so far? You can also try Incus immediately online right here.
Table of Contents
- Incus vs Proxmox – The Main Differences
- Incus Overview
- Install Incus on Debian 13 and Create a Cluster
- Incus Cluster Management
- Installing Incus Web UI
- Using Incus
- Conclusion
Incus vs Proxmox – The Main Differences
When it comes to managing virtual machines and containers, two popular open-source solutions often come to mind: Incus and Proxmox. Both are powerful and highly regarded tools in the virtualization space, but they take different approaches in how they manage underlying infrastructure and handle clustering, scaling, and guest management. This chapter will dive deep into comparing the two, focusing on their differences and similarities while examining how they utilize core technologies like QEMU and LXC to operate guests.
Core Technologies: QEMU and LXC
Both Incus and Proxmox leverage well-established underlying tools for managing virtual machines and containers: QEMU for virtual machines and LXC for containers. These technologies are battle-tested and provide the foundation for running guest workloads across both platforms.
- QEMU allows both tools to run full virtual machines, providing virtual hardware for running isolated operating systems.
- LXC (Linux Containers), on the other hand, is used for lightweight, resource-efficient containerized workloads that share the host’s kernel.
While both platforms use QEMU and LXC to manage these workloads, the primary difference lies in how they implement and orchestrate these tools.
Clustering and High Availability
One of the key areas where Incus and Proxmox differ significantly is in their approach to clustering and high availability.
Proxmox uses Corosync and PMXCFS for its clustering mechanism. Corosync is a highly reliable messaging layer that ensures cluster nodes can communicate efficiently, while PMXCFS provides the configuration file system for storing cluster-wide configuration data. Together, these components allow Proxmox to manage a multi-master cluster configuration. This means that any node can take on the role of master and provide centralized management for the virtual machines and containers across the cluster.
However, Proxmox’s reliance on Corosync introduces some challenges. While it provides a robust clustering framework, setting up and managing larger clusters can become more complex.
Incus, on the other hand, avoids Corosync and adopts a different approach to clustering. Incus uses a distributed database, powered by the Raft algorithm, to synchronize cluster state across nodes. The distributed database is replicated across all nodes to ensure consistency and fault tolerance. This means that Incus clusters can consist of a wide range of node roles, including:
- Database – stores the state of the cluster
- Voting Member – participates in the Raft consensus algorithm
- Database-Leader – the current leader of the distributed database
- Database-Standby – a non-voting backup member of the distributed database
- Event-Hub – a central exchange point for internal Incus events (requires at least two nodes)
- OVN-Chassis – part of the software-defined networking layer for managing container networking
This approach offers a lot more flexibility in cluster management, making it easier to scale without the tight coupling and complexities introduced by Corosync. It also means that handling clusters in Incus is generally easier, and there is no hard limit to the number of nodes. While the recommended cluster size is 50 nodes, the community has reported successful deployments with clusters exceeding 150 nodes, although my personal experience has been with clusters up to 8 nodes.
Load Balancing and Rebalancing
An area where Incus clearly outshines Proxmox is in its built-in load balancing and rebalancing features. In Incus, rebalancing is automatic, meaning workloads are evenly distributed across the available nodes in the cluster to optimize resource usage. This automatic balancing reduces the need for manual intervention and external tools.
In contrast, Proxmox does not offer built-in load balancing or rebalancing capabilities out of the box. Users of Proxmox typically need to rely on third-party tools like ProxLB to implement these features. This adds another layer of complexity to setting up a production environment in Proxmox, requiring additional configuration and maintenance of external tools.
Ease of Use and Web Interfaces
Both Incus and Proxmox offer excellent API and CLI tooling, providing flexibility and control for users who prefer working through command-line interfaces or automation scripts.
However, Proxmox has a distinct advantage for beginners. It includes a built-in web interface for managing clusters, virtual machines, and containers, which makes it very accessible for users who may not be comfortable with CLI operations. The web interface is intuitive and easy to set up, reducing the learning curve significantly.
On the other hand, Incus does not come with a built-in web interface by default. If users wish to use a graphical interface, they need to install the web frontend separately. While this gives more flexibility to users who prefer a minimal setup or those who wish to integrate Incus with other tools, it does mean that Incus requires a little more setup to get started.
Another key benefit of Incus is its ability to run on any Linux distribution. Unlike Proxmox, which is based on Debian and encourages users to use their own Proxmox VE-based operating system, Incus offers the freedom to choose a distribution that best fits your needs. This flexibility is appealing to those who want a more tailored or lightweight environment.
ARM64 Support
A significant reason for the increasing popularity of Incus over Proxmox in certain hosting environments is ARM64architecture support. Many hosting providers now offer ARM64-based instances due to their efficiency and cost-effectiveness. Incus natively supports ARM64, and users can easily deploy and manage virtual machines and containers on ARM64 hardware.
In contrast, Proxmox does not officially offer ARM64-based images. While it is possible to run Proxmox on ARM64 hardware through custom setups, this requires a lot more manual effort and is not officially supported. As such, Incus is the go-to option for users who require full support for ARM64 workloads.
General Usage and Features
As more people and companies look for alternatives to VMware, especially with licensing changes and rising costs, options like Incus and Proxmox are getting a lot more attention. Both are solid open-source solutions that rely on the same underlying Linux technologies, mainly LXC/LXD for containers and QEMU/KVM for virtual machines but they go about managing those technologies in very different ways. The choice between the two often comes down to what kind of user you are, how much abstraction you want, and whether you’re optimizing for simplicity, flexibility, or ease of use.
Let’s talk about storage first. Proxmox makes adding and managing storage incredibly straightforward. You can just click through the web interface and set up local disks, ZFS, NFS, iSCSI, Ceph, whatever you need, and it’ll work out of the box with clear options and a polished UI. Incus also supports a bunch of storage backends like ZFS, Btrfs, LVM, dir, and Ceph, but setting it up is usually a manual process. You’re often writing YAML configs, using the CLI, or talking directly to the API. That’s great if you want full control and understand what’s going on under the hood, but it’s not something you hand off to a junior admin on their first day.
When it comes to backups, the story’s pretty similar. Proxmox has scheduled backups, snapshot management, compression, and remote backup capabilities already integrated. You can do most of it through the GUI, and it’s pretty intuitive. Incus can do snapshots and export instances as backups too, but automating and managing them at scale usually means writing your own scripts or gluing things together with cron and rsync. That’s fine if you want to build something tailored, but again, it requires more hands-on effort.
Now, user management is one of the more divisive areas. Proxmox has role-based access control built in and it just works. You can create users, assign them permissions, hook up LDAP or PAM, and control what people can and can’t see – all through the interface. Incus, in contrast, leans hard into security-first principles by using x.509 client certificates for authentication. On paper, that’s a very elegant system. In practice, though, managing client certificates at scale is a pain. I’ve only seen it work successfully in a couple of companies, and even then it required a mature PKI setup and a team that really knew what they were doing. For a small team or a personal setup, it might be fine. But in a corporate setting, where multiple users need different roles and access scopes, it can become unmanageable very quickly.
Probably the most noticeable difference between the two platforms is how you actually interact with them. Proxmox is very much built around the GUI. Almost everything you can do, from spinning up VMs to managing firewall rules to setting up backups, can be done through a nice, modern web interface. For people coming from VMware and used to “ClickOps,” this is a huge plus. Incus, on the other hand, is unapologetically API-first. It has a powerful CLI, and everything you do goes through the REST API. There are community-built GUIs floating around, but they’re not official or on the same level of polish. This makes Incus much more appealing to folks who are deep into automation, who want to use Ansible, Terraform, or shell scripts to manage everything. But for someone used to clicking through a GUI, it’s a steep adjustment.
One of the biggest selling points of Incus is how lightweight it is. It doesn’t come with a bunch of extras you might not need, and it runs just fine on low-resource machines. That’s a huge pro for homelabbers or anyone running things on old hardware or small clusters. You get to build exactly what you need without extra overhead. But that same minimalism can become a limitation in an enterprise setting. Companies often prefer platforms that come with batteries included: where backup, monitoring, access control, and GUI management are just part of the deal. Proxmox fits that model better. It’s heavier, but it’s more complete out of the box.
In the end, both Incus and Proxmox can do almost everything you’d expect from a modern virtualization platform. They’re both using the same core technologies; they just expose them differently. Incus is more of a toolkit that expects you to build and automate your environment. Proxmox is more like an appliance – it gives you a feature-rich interface and takes care of most of the hard parts for you. It really comes down to what you value more: control and lightweight flexibility, or convenience and comprehensive management.
Incus Overview
Overview
Getting Incus up and running on your system is a straightforward process, especially if you stick with the pre-built packages available for most Linux distributions (such like Alpine, Arch, Chimera, Debian, Fedora, Gentoo, NixOS, SUSE, Rocky, Ubuntu but also on other operating systems like macOS) and this is a huge benefit over Proxmox, which is based on Debian by default. This means, you can simply run the same setup on your preferred system. These packages provide the fastest and most convenient way to install Incus and get started with container and virtual machine management. However, for those who prefer a hands-on approach or need custom builds, Incus can also be compiled and installed directly from its source code. For Debian, it might be worth to wait for Debian Trixie (Testing) which natively supports Incus. You can already hop on on Bookworm with the backport packages or simply give it a try on Trixie.
Once the installation is complete, there’s one important post-installation step to be aware of: user access control. Incus requires the presence of a special user group called incus-admin. Any user added to this group will have permission to interact with the Incus daemon. This is an essential step for multi-user systems or when running Incus commands as a non-root user. If you’re unsure how to manage group permissions or want to restrict or expand user access, consult the official “Manage access to Incus” documentation for detailed guidance.
Before you install, it’s worth considering which version of Incus best suits your needs. Incus offers two types of release tracks: Long Term Support (LTS) releases and rolling feature releases. The current LTS version, 6.0, is ideal for production environments where stability and security are top priorities. These LTS versions receive regular bug fixes and security patches but do not include any new features once released. In contrast, the feature release branch – currently 6.x – delivers the latest improvements and capabilities with monthly updates. This is the preferred choice if you’re experimenting, developing, or simply want access to the newest tools and integrations as they become available.
Container or Virtual Machine
Wait, VMs? Yes! Incus supports two major types of instances: containers and virtual machines. These two formats allow users to choose the best approach for their workloads depending on performance, compatibility, and isolation needs. Although they serve similar purposes, containers and virtual machines in Incus are implemented differently and offer distinct capabilities.
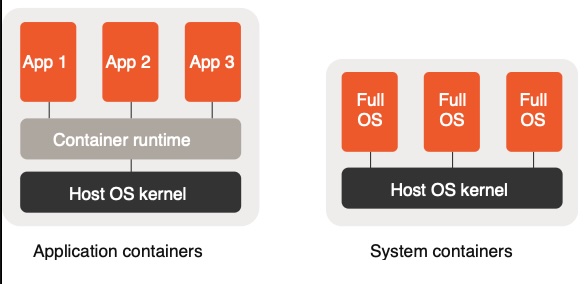
Containers in Incus are system containers. Unlike application containers like those used with Docker, system containers are more like lightweight virtual machines that run a complete operating system. Incus uses a user-space tool to manage these containers. They boot up using the host’s Linux kernel and are very efficient in terms of resource usage, making them ideal for high-density deployments. Containers share the host’s kernel but are otherwise isolated through technologies like cgroups and namespaces. This allows users to run multiple Linux distributions or versions simultaneously, such as Ubuntu, CentOS, or Alpine, all on the same physical machine. These containers behave almost identically to virtual machines from a user and process perspective, which makes them excellent for development, testing, and production systems where low overhead is important.
On the other hand, Incus also supports virtual machines, which are full emulated systems using QEMU. These virtual machines run their own independent kernel, which means they can support operating systems that are not based on Linux, such as Windows or BSD variants. This makes virtual machines a good choice when complete isolation is required or when kernel-level customization is necessary. Because VMs in Incus use hardware-level virtualization (with KVM support), they offer strong security boundaries and can simulate an entire hardware stack, including firmware, disk, and network interfaces. Despite their heavier footprint compared to containers, they are often necessary for workloads that rely on kernel-specific behavior or need to match production environments exactly.
One of the key strengths of Incus is that both containers and virtual machines are managed using the same unified CLI and API. This consistency simplifies automation and integration, and it allows users to switch between containers and VMs depending on the use case without having to learn separate tools or workflows. Creating, configuring, and launching instances follows the same model regardless of whether you’re dealing with a container or a VM.
In practice, this means you can quickly spin up a Linux container for testing a script, then later create a virtual machine to test the same script under Windows, all within the same Incus environment. Incus even supports features like snapshotting, live migration, and image publishing for both types of instances, which further blurs the line in terms of manageability.
Understanding the difference between containers and virtual machines in Incus is important for making the right choice. Containers offer speed and resource efficiency for Linux-based workloads, while virtual machines offer greater compatibility and isolation at the cost of slightly higher overhead. Having both options in a single platform gives Incus users the flexibility to build and manage diverse infrastructure with ease and in the end – it’s up to you what fits your needs best!
Requirements
Incus is developed with modern Linux kernels in mind, so your kernel should be version 5.15 or higher. This is important because Incus relies on several key kernel features such as namespaces, cgroups, AppArmor (or SELinux), and seccomp, which are more robust and complete in newer kernels.
On the system side, root privileges or sudo access are required to install and configure Incus. After installation, it’s also necessary to ensure your user is part of the incus-admin group. This group grants permission to interact with the Incus daemon without requiring root access each time.
In terms of virtualization support, if you plan to run virtual machines (not just containers), your hardware must support KVM virtualization. That means your CPU needs to support either Intel VT-x or AMD-V, and KVM must be enabled in your BIOS/UEFI settings. Additionally, the qemu-system package should be installed and functional for managing virtual machines. At this points, it’s very similar to Proxmox.
Storage backends are also a consideration. Incus supports ZFS, Btrfs, LVM, and directory-based storage. While you can get started with a simple directory backend for testing, it’s recommended to use ZFS or Btrfs for production or performance-sensitive use cases. You may need to install and configure your chosen storage driver before launching containers.
On the networking side, Incus uses bridge networking to connect containers and VMs. This requires the ability to create network interfaces (usually via bridge-utils or the built-in kernel tools). You should also check that your system allows unprivileged users to create network namespaces and configure bridge devices, or be ready to run those parts of the setup as root.
Lastly, while not a strict requirement, having IPv6 enabled will make some network features more robust, especially in clustered or cloud environments.
Install Incus on Debian 13 and Create a Cluster
Setup Overview
Within this HowTo, we will install Incus on Debian 13 (Trixie/Testing) on two nodes and initiate a small two node cluster (as mentioned before, it is highly recommended to have at least three nodes in a productions setup). The clusters networking will be separated for VM upstream and internal cluster connectivity on different network cards where we use:

incus01
VM-Uplink: 10.10.10.178 (Interface: ens18)
Cluster: 192.168.10.1 (Interface: ens19)
incus02
VM-Uplink: 10.10.10.181 (Interface: ens18)
Cluster: 192.168.10.2 (Interface: ens19)
While there are different ways to form a cluster, we will generate a join token for each node. You may also finde some more information about forming clusters right here.
Installing Incus Packages
As mentioned before, installing Incus becomes pretty easy on Debian 13 without adding any backports repositories and can immediately be performed from the native repository by running the following command on both nodes:
apt-get update
apt-get -y install incus incus-base
Afterwards, incus must be initiated. Take care at this point, because we want to create a cluster which runs on our dedicated network interface for the cluster connectivity and one node needs to initiale the cluster, while the other one joins the cluster.
Initiating & Creating an Incus Cluster on Incus01
On our first node, incus01, we now initiate and create the cluster with the command incus admin init, set the cluster link to ens19 with the IP address 192.168.10.1 and simply use the local storage pool.
root@incus01:~# incus admin init
Would you like to use clustering? (yes/no) [default=no]: yes
What IP address or DNS name should be used to reach this server? [default=10.10.10.178]: 192.168.10.1
Are you joining an existing cluster? (yes/no) [default=no]:
What member name should be used to identify this server in the cluster? [default=incus01]:
Do you want to configure a new local storage pool? (yes/no) [default=yes]:
Where should this storage pool store its data? [default=/var/lib/incus/storage-pools/local]:
Do you want to configure a new remote storage pool? (yes/no) [default=no]:
Would you like to use an existing bridge or host interface? (yes/no) [default=no]:
Would you like stale cached images to be updated automatically? (yes/no) [default=yes]:
Would you like a YAML "init" preseed to be printed? (yes/no) [default=no]: yes
config:
  core.https_address: 192.168.10.1:8443
networks: []
storage_pools:
- config: {}
  description: ""
  name: local
  driver: dir
storage_volumes: []
profiles:
- config: {}
  description: ""
  devices:
    root:
      path: /
      pool: local
      type: disk
  name: default
  project: default
projects: []
cluster:
  server_name: incus01
  enabled: true
  member_config: []
  cluster_address: ""
  cluster_certificate: ""
  server_address: ""
  cluster_token: ""
  cluster_certificate_path: ""
Afterwards, we need to create a cluster join token for each node that should join this bootstrap cluster which can be done by running the incus cluster add command:
root@incus01:~# incus cluster add 192.168.10.2
Member 192.168.10.2 join token:
eyJzZXJ2ZXJfbmFtZSI6IjE5Mi4xNjguMTAuMiIsImZpbmdlcnByaW50IjoiZTE3NGI3YmI0NmZhNDYwOGFiNzA5NDFhZjkyNWJmZmFhZDUzMjZhNzIxYTVkZTFiYzU0YWRkYWJkYjc3YjBhMiIsImFkZHJlc3NlcyI6WyIxOTIuMTY4LjEwLjE6ODQ0MyJdLCJzZWNyZXQiOiI4NTFlYTNmMTI3MDU0MjQ0YTNlYzY4ZmNiZDk5MTAyOTc4OGE2NWVjNGM3OWNlODY3NTk0NmYzY2NiNGM2ZmUxIiwiZXhwaXJlc19hdCI6IjIwMjUtMDUtMDRUMDY6NTc6MDYuNjMzNDMwMjE0WiJ9
Joining an Incus Cluster on Incus02
On our second, incus02 (and all other ones that should join the bootstrap cluster), we now also run the incus admin init command with just some other responses to join the cluster:
root@incus02:~# incus admin init
Would you like to use clustering? (yes/no) [default=no]: yes
What IP address or DNS name should be used to reach this server? [default=10.10.10.181]: 192.168.10.2
Are you joining an existing cluster? (yes/no) [default=no]: yes
Please provide join token: eyJzZXJ2ZXJfbmFtZSI6IjE5Mi4xNjguMTAuMiIsImZpbmdlcnByaW50IjoiZTE3NGI3YmI0NmZhNDYwOGFiNzA5NDFhZjkyNWJmZmFhZDUzMjZhNzIxYTVkZTFiYzU0YWRkYWJkYjc3YjBhMiIsImFkZHJlc3NlcyI6WyIxOTIuMTY4LjEwLjE6ODQ0MyJdLCJzZWNyZXQiOiI4NTFlYTNmMTI3MDU0MjQ0YTNlYzY4ZmNiZDk5MTAyOTc4OGE2NWVjNGM3OWNlODY3NTk0NmYzY2NiNGM2ZmUxIiwiZXhwaXJlc19hdCI6IjIwMjUtMDUtMDRUMDY6NTc6MDYuNjMzNDMwMjE0WiJ9
All existing data is lost when joining a cluster, continue? (yes/no) [default=no] yes
Choose "source" property for storage pool "local":
Would you like a YAML "init" preseed to be printed? (yes/no) [default=no]:
Incus Cluster Management
After joining the bootstrap cluster, we already have a working two-node cluster. With the cluster argument, we can manage our cluster on the cli. To gather an overview of our cluster, we can simply run the command incus cluster list to get the overview:

When you create an Incus cluster, the system uses a distributed database (CowSQL) to keep track of the cluster’s internal state. In smaller clusters – specifically those with three members – all nodes actively replicate the database, ensuring that every node holds a full, synchronized copy. As your cluster grows beyond three members, not every node will replicate the database anymore. Instead, only a selection of members take on that responsibility, while the rest can still access the database, but without storing their own replicated copy.
At the heart of this setup is the cluster leader, a node automatically elected by Incus. This leader plays a vital role: it keeps an eye on the health and connectivity of all other members. If something goes wrong – say, the leader goes offline – another suitable member will be promoted to take its place, keeping the cluster stable and functional.
Among the nodes that replicate the database, there are two automatic roles: voters and standbys. Voters have the ability to participate in leadership elections and help maintain database consensus. Stand-by nodes, on the other hand, are backups waiting on the sidelines. If a voter goes offline, one of these stand-by nodes will automatically step up and become a new voter, ensuring that the cluster maintains a majority and doesn’t lose availability.
The cluster remains healthy and operational as long as a majority of voter nodes are online. So with the default setup, three voters and two standby systems, you can lose one voter without disrupting service. More than that, and the cluster may lose its ability to make decisions or keep the database in sync.
Incus Cluster Roles
Incus assigns several roles to cluster members, some automatically and others manually:
- The database role is automatically given to nodes that are voting members of the database.
- The database-leader is the current leader among the database nodes.
- The database-standby role goes to nodes that are ready to replace a voter if needed.
- The event-hub role can be assigned manually and is used to coordinate internal events across the cluster.
- The ovn-chassis role is also optional and is relevant when you’re using OVN (Open Virtual Network) for network overlays—these nodes act as uplink gateways.
By default, Incus clusters are set up with three voter members (cluster.max_voters = 3) and two stand-bys (cluster.max_standby = 2). This setup offers a balanced tradeoff between high availability and resource use, giving you enough redundancy to tolerate node failures without overloading every machine with replication duties.
Incus Cluster Re-Balancing / Loadbalancing
When you’re running a cluster with multiple servers, it’s important to keep the load spread out evenly so that no single machine gets overwhelmed. Incus can handle this automatically (which I had to create myself for Proxmox clusters with my ProxLB project) by monitoring the state of the cluster and shifting workloads when needed. This process is called cluster rebalancing, and it helps keep performance steady without you having to constantly manage it manually.
Incus checks how busy each cluster member is and compares the load between them. If one server is using a lot more resources than the others—and the difference goes beyond a certain limit—it will try to fix that. It does this by live-migrating virtual machines from the overloaded server to a less busy one. This all happens behind the scenes and without any downtime for the VMs being moved.
You can fine-tune how this rebalancing works using a few settings:
cluster.rebalance.thresholdsets the minimum percentage difference in load between servers before Incus decides it’s time to move something.cluster.rebalance.intervalcontrols how often Incus checks the load across the cluster.cluster.rebalance.cooldowndefines how long to wait after moving a VM before checking again and potentially moving another.cluster.rebalance.batchlimits how many VMs can be moved in one go, so the network and systems aren’t overwhelmed.
It’s important to note that unlike my ProxLB for Proxmox this automatic balancing only applies to virtual machines for now – containers won’t be moved automatically. Still, since VMs typically use more resources, balancing them out can make a big difference in overall performance.
Installing Incus Web UI
Incus does not come with a webinterface by default and is mostly API and CLI driven. However, most people coming from Proxmox (or even VMware) like to have a webinterface for an easier administration in place. Unfortunately, those packages are not even in Debian 13 / Trixie packaged and require us to add the third party Zabbly repository.
curl -fsSL https://pkgs.zabbly.com/key.asc -o /etc/apt/keyrings/zabbly.asc
vi /etc/apt/sources.list.d/incus-stable.sources
Adding the following content:
Enabled: yes
Types: deb
URIs: https://pkgs.zabbly.com/incus/stable
Suites: trixie
Components: main
Architectures: amd64
Signed-By: /etc/apt/keyrings/zabbly.asc
Afterwards, the webinterface can be installed by running the following command:
apt-get update
apt-get -y install incus-ui-canonical
After installing the packages, a listener for the webinterface needs to be defined. In most cases, you like to define a dedicated interface / network for the management. Within this example, we re-use the upstream network which is directly accessible.
# Note: You may want to set this to your MGMT-NET
incus config set core.https_address 10.10.10.178:8443
You can now simply point your browser to https://10.10.10.178:8443 – at this point, we can start using the WebUI for further management.
The first time you open the Incus web UI, you’ll be prompted to generate a client certificate. This certificate acts like your personal key, allowing you to securely connect to the Incus API through your browser. Without it, the server will refuse access. This ensures that only trusted users—those who have a certificate that was explicitly accepted—can manage your infrastructure through the web interface.
Once you start the certificate generation process, the interface will offer instructions tailored to your browser. Whether you’re using Chrome, Firefox, or Safari, the web UI includes guidance on how to download and import the certificate into your browser’s security settings. Each browser handles certificates a little differently, but the instructions make it easy, even if you’re doing it for the first time.
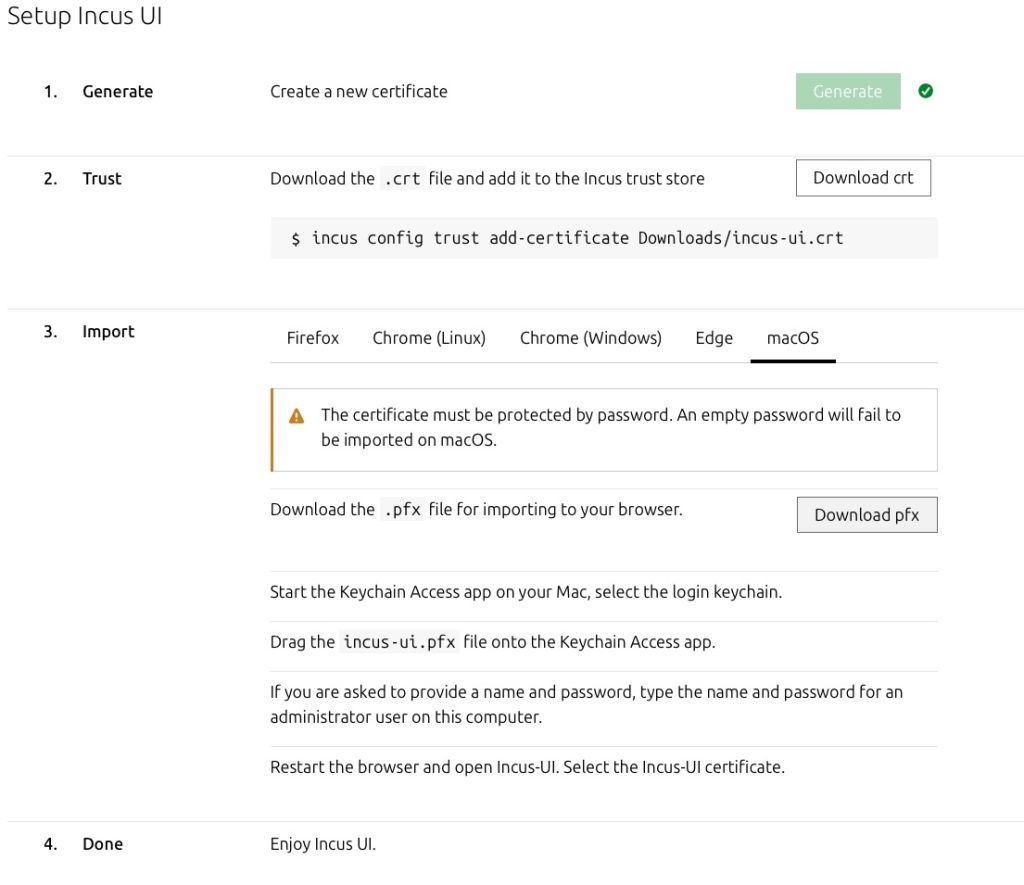
At this point you have to take care, because it might be confusing when doing it for the first time. This consists of two steps where you need to add and trust you personal certificate in Incus, but also need to add your client certificates to your workstation / browsers key store.
Trusting the Certificate in Incus
The Incus Web UI does not use traditional username and password authentication; instead, it relies on client certificate authentication for secure access. While this method enhances security, it can be a bit challenging to set up for first-time users. Therefore, we provide a step-by-step guide below to help you configure it correctly.
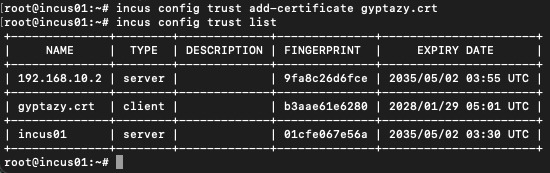
incus config trust add-certificate gyptazy.crt
incus config trust list
Afterwards, it should look like this and presenting a certificate of type client:
In the next step, you need to add your client certificate to your local system’s or browser’s key store and this depends on your used browser. The Incus wizard helps you out there.
After importing the certificate, you’ll usually need to refresh the page or restart your browser, at which point it will present the certificate to the Incus server automatically. If the certificate is trusted by the server (meaning it has been approved), you’ll be granted access to the web interface. From there, you can manage your containers, virtual machines, storage, and networking just like you would from the command line – only now through a user-friendly UI.
Using Incus
Before creating containers and VMs, it’s essential to configure the underlying uplink network to ensure it can properly assign network access to the guests. This configuration ensures that the containers and VMs will have the necessary network connectivity to function correctly. Properly setting up the uplink network is a crucial step in ensuring smooth operation and communication for your virtualized environments.
Creating a Network-Bridge
To provide network connectivity for your virtual machines (VMs) and containers, you can create a network bridge in the Incus WebUI. Here’s a quick guide to setting it up:
- Navigate to
Networking -> Network -> Create Network. - Set Type to Bridge and name it
VM-UPLINK for easy identification. - Choose Bridge Driver as Native to use the host’s native bridging capabilities.
Once created, assign the bridge (VM-UPLINK) to your guests in their respective network settings to enable proper network access. Ensure the uplink network is configured correctly for smooth communication.
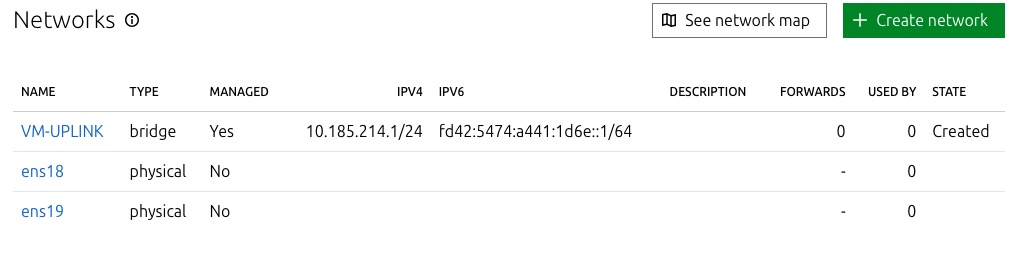
When adding or modifying network objects in the Incus WebUI, these changes are automatically applied across all nodes in the cluster. This ensures consistent network configurations and seamless management across the entire cluster environment.
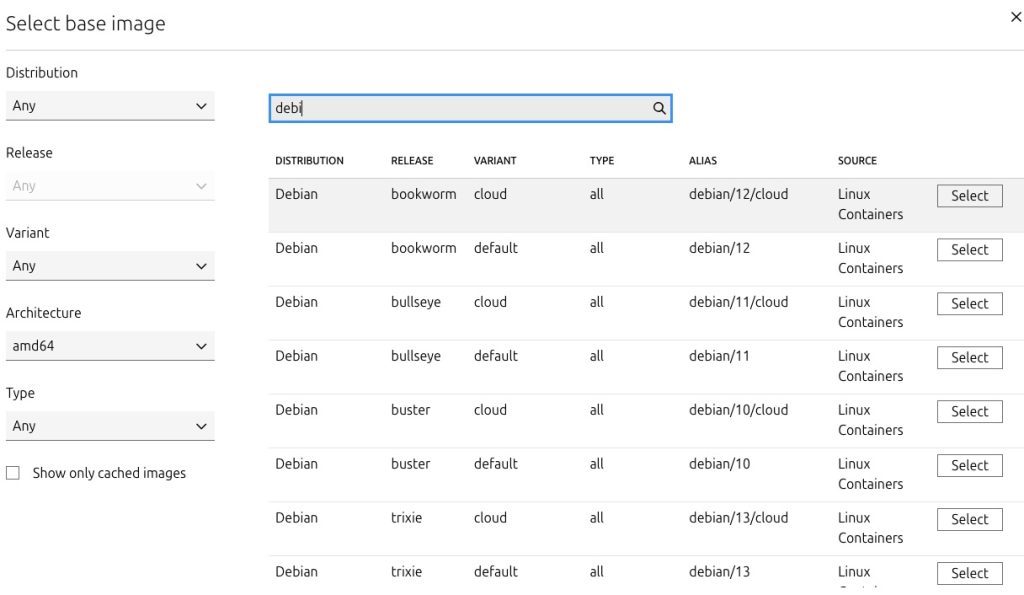
Creating a Guest
Creating a guest in Incus, whether a container or a virtual machine (VM), is a simple process that starts with selecting an image from a large gallery of pre-configured templates. These images allow you to quickly deploy a wide variety of operating systems or applications with just a few clicks.
Once the image is selected, you can customize the guest’s configuration by defining typical parameters like CPU, memory, disk size, and network settings to fit your needs.
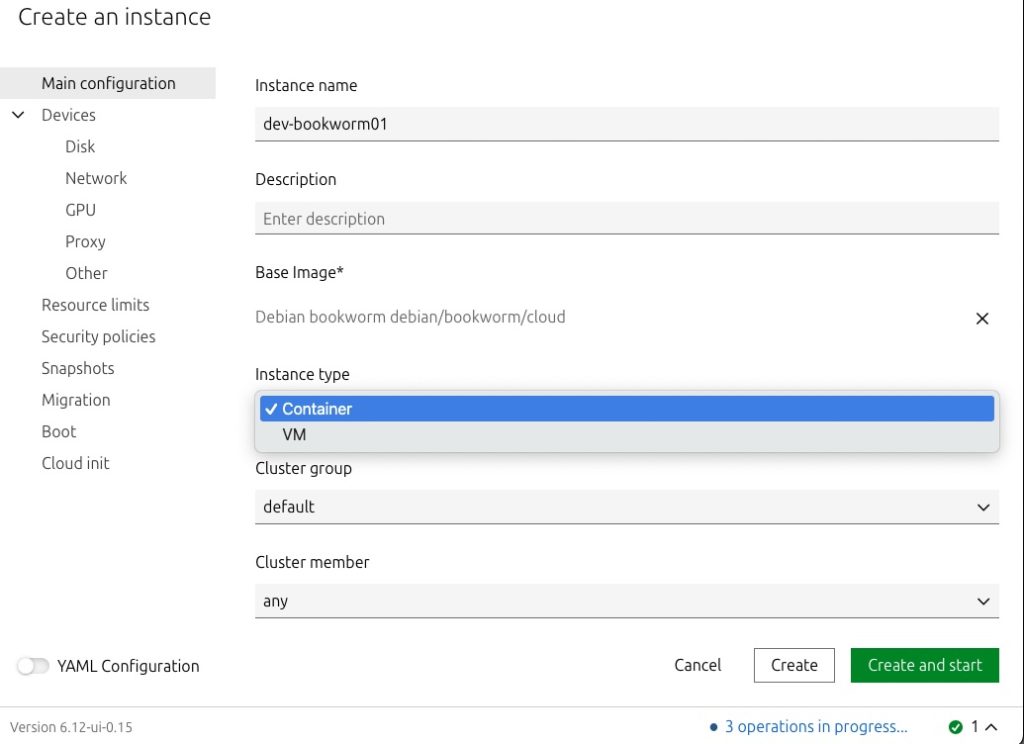
Additionally, Incus supports advanced features like hardware device passthrough and virtual GPU (vGPU) allocation, enabling you to assign specific hardware resources directly to your guests for improved performance. Of course, this also supports often requested features like setting resource limits, Snapshots, Cloud init and many more.
Conclusion
In conclusion, Incus presents itself as a modern, secure, and powerful system container and virtual machine manager, offering promising features, especially for cloud and lab environments. Despite being a relatively new tool, it demonstrates solid performance, particularly in cluster management, thanks to robust underlying tools like Cowsql, which ensure stability. The ability to orchestrate clusters with advanced features like rebalancing, load balancing, and node draining for maintenance adds significant value. Additionally, the out-of-the-box ARM64 support is a major advantage, making it particularly attractive for users with ARM-based hardware, such as Raspberry Pis or Ampere-powered cloud instances from providers like NetCup or Hetzner.
However, the WebUI of Incus may pose a steeper learning curve, especially when it comes to advanced features like RBAC and external authentication, where Proxmox provides a more user-friendly experience. While Incus works well and manages resources effectively, it does require more effort to use compared to Proxmox. Nonetheless, its native ARM64 support and powerful orchestration capabilities make it a compelling choice, and with future updates, it could become a strong contender in the system container and virtual machine management space.
[…] Incus for Containers and VMs: A Powerful Proxmox Alternative? A Step-by-Step Guide to build a Cluste… […]
[…] Incus for Containers and VMs: Powerful Proxmox Alternative? https://gyptazy.com/incus-for-containers-and-vms-a-powerful-proxmox-alternative-a-step-by-step-guide… […]
Comments are closed.