Setting up a reliable mail infrastructure is no longer limited to large organizations. With modern components like Stalwart Mail Server and FoundationDB, it is possible to run a highly available and distributed mail platform without relying on a single machine or a fragile storage backend and I became a pretty huge fan of this setup. The goal of this setup is to create a mail system that continues operating even when individual nodes fail, while remaining manageable for self hosted environments or smaller production deployments. And trust me, it's really easy to set up without requiring any further tools like Postfix, Dovecot/Cyrus/Courier - and it also comes with anti-spam, DKIM, DMRAC built in!
Email remains a critical service for many use cases. When a mail server goes offline, messages can be delayed or lost, and recovery can be complicated if the system depends on local storage or a single database. A distributed backend helps address these issues by replicating data across multiple nodes and maintaining consistency between them. By using Stalwart as the mail server and FoundationDB as the backend on Debian Linux based systems, it becomes possible to build a cluster that offers redundancy, resilience, and the ability to scale over time.
This article describes the process of creating a highly available mail server using Stalwart together with FoundationDB. It covers the overall architecture, the role of the database cluster, and how the mail server integrates with a distributed storage layer. It also looks at practical aspects such as failover behavior, configuration decisions, and operational considerations that appear during deployment.
The intention is to provide a clear and realistic overview of how such a setup can be built and maintained. Rather than focusing on theory alone, the focus is on a working configuration and the reasoning behind it. For anyone interested in running a modern and resilient self hosted mail platform, this serves as a starting point for building a stable high availability mail environment.
Stalwart & FoundationDB vs. The Traditional Mail Stack
For decades, the standard for self-hosted email has been a "modular" stack: Postfix for SMTP, Dovecot for IMAP/POP3, and a mix of SpamAssassin, OpenDKIM, and Rspamd for security. While reliable, this approach often feels like a house of cards when trying to scale or achieve true high availability.
Transitioning to a modern stack like Stalwart with a FoundationDB backend replaces these disparate moving parts with a unified, distributed architecture. Here is how they compare:
| Feature | Traditional (Postfix + Dovecot) | Modern (Stalwart + FoundationDB) |
|---|---|---|
| Architecture | Modular (Multiple daemons/configs) | Unified (Single application) |
| High Availability | Complex (Requires Shared Storage/DRBD) | Native (Distributed via FoundationDB) |
| Security Protocols | Requires 3rd-party tools (OpenDKIM, etc.) | Built-in (DKIM, DMARC, SPF, ARC) |
| Storage Layer | Filesystem-based (Maildir/mbox) | Key-Value Store (ACID Compliant) |
| Configuration | Text-heavy (Multiple .cf files) | Modern (TOML + Web UI) |
Pros and Cons
- Pros: Massive reduction in maintenance overhead, horizontal scalability, and built-in encryption at rest.
- Cons: Higher memory footprint (FoundationDB requires more RAM than local filesystems) and a learning curve for those accustomed to legacy config files.
Ultimately, if you are looking for a resilient system that does not break when a single node fails, the Stalwart and FoundationDB combination is the clear winner for modern Debian deployments.
Pros and Cons
- Pros: Massive reduction in maintenance overhead, horizontal scalability, and "one-click" encryption at rest.
- Cons: Higher memory footprint (FoundationDB likes RAM) and a steeper learning curve for those used to 1990s-style config files.
Ultimately, if you are looking for a set-and-forget system that won't break when a single hard drive fails, the Stalwart and FoundationDB combination is the clear winner for modern Debian deployments.
FoundationDB Cluster Initialization
This chapter describes how to install and configure a FoundationDB cluster on Debian based systems using the official deb packages provided through the GitHub release page. The goal is to create a small cluster that can be used as a distributed backend for services such as a highly available mail server. The steps below use a simple master and additional nodes approach and rely on manual configuration so that the cluster layout and addresses are fully controlled.
Installation of the FoundationDB Cluster
The first step is to download the FoundationDB client and server packages from the official GitHub release. These packages contain everything required to run the database processes and connect to the cluster.
wget https://github.com/apple/foundationdb/releases/download/7.3.69/foundationdb-clients_7.3.69-1_amd64.deb
wget https://github.com/apple/foundationdb/releases/download/7.3.69/foundationdb-server_7.3.69-1_amd64.deb
After downloading the packages, install them on all nodes that should participate in the cluster. Both the client and server packages are required on each node.
dpkg -i foundationdb-clients_7.3.69-1_amd64.deb
dpkg -i foundationdb-server_7.3.69-1_amd64.deb
Configuration of the FoundationDB Cluster
One node is prepared first and acts as the initial cluster node. This system will generate the cluster file that must later be copied to all other nodes. The configuration is adjusted so that FoundationDB listens on the actual network address instead of localhost.
On the first node, determine the primary IP address that should be used for the cluster communication and replace the default localhost entry inside the cluster file with the desired IP address. The following snippet takes the IP address of the eth0 interface for further configurations:
IP=$(ip -4 addr show eth0 | awk '/inet / {print $2}' | cut -d/ -f1) sed -i -E "s@127\.0\.0\.1(:[0-9]+)@$IP\1@g" /etc/foundationdb/fdb.cluster
The server configuration also needs to advertise the correct public address. This ensures that other nodes in the cluster can connect to the database process on this system. Therefore, we need to adjust the public-address part on both server with their cluster-ip address. The listener already uses this address in newer FoundationDB versions and does not need to be modified. the following snippet allows us to quickly modifly this with a simple regex:
sed -i '/^\[fdbserver\]$/,/^\[/{s/^public-address = auto:/public-address = '"$IP"':/}' \ /etc/foundationdb/foundationdb.conf
Once the configuration has been updated, enable and start the FoundationDB service.
systemctl enable foundationdb.service
systemctl start foundationdb.service
After the first node is running, the remaining nodes can be added to the cluster. Each additional node needs the same packages installed and must receive a copy of the cluster file from the first node. The file located at /etc/foundationdb/fdb.cluster defines how all nodes discover each other.
Copy the cluster file from the first node to each additional node.
scp root@master:/etc/foundationdb/fdb.cluster /etc/foundationdb/fdb.cluster
On each additional node, update the public address in the server configuration so that the process announces its own IP address instead of using automatic detection.
IP=$(ip -4 addr show eth0 | awk '/inet / {print $2}' | cut -d/ -f1) sed -i '/^\[fdbserver\]$/,/^\[/{s/^public-address = auto:/public-address = '"$IP"':/}' \ /etc/foundationdb/foundationdb.conf
## foundationdb.conf
##
## Configuration file for FoundationDB server processes
## Full documentation is available at
## https://apple.github.io/foundationdb/configuration.html#the-configuration-file

[fdbmonitor]
user = foundationdb
group = foundationdb

[general]
restart-delay = 60
## by default, restart-backoff = restart-delay-reset-interval = restart-delay
# initial-restart-delay = 0
# restart-backoff = 60
# restart-delay-reset-interval = 60
cluster-file = /etc/foundationdb/fdb.cluster
# delete-envvars =
# kill-on-configuration-change = true

## Default parameters for individual fdbserver processes
[fdbserver]
command = /usr/sbin/fdbserver
public-address = 10.0.1.31:$ID
listen-address = public
datadir = /var/lib/foundationdb/data/$ID
logdir = /var/log/foundationdb
# logsize = 10MiB
# maxlogssize = 100MiB
# machine-id =
# datacenter-id =
# class =
# memory = 8GiB
# storage-memory = 1GiB
# cache-memory = 2GiB
# metrics-cluster =
# metrics-prefix =

## An individual fdbserver process with id 4500
## Parameters set here override defaults from the [fdbserver] section
[fdbserver.4500]

[backup_agent]
command = /usr/lib/foundationdb/backup_agent/backup_agent
logdir = /var/log/foundationdb

[backup_agent.1]
Before starting the service, clear any existing data directory to ensure the node joins the cluster cleanly. This might happen when the systemd unit (FoundationDB process) has already been started and a cluster ID has been generated. By the given snippet, this can be deletated to start over from scratch:
Warning: This deletes all present content!
systemctl stop foundationdb.service
rm -rf /var/lib/foundationdb/data/*
systemctl start foundationdb.service
fdbcli
status details

Cluster:
 FoundationDB processes - 3 (less 0 excluded; 1 with errors)
 Zones - 3
 Machines - 3
 Memory availability - 2.0 GB per process on machine with least available
 >>>>> (WARNING: 4.0 GB recommended) <<<<<
 Fault Tolerance - 0 machines
 Server time - 02/14/26 11:10:47
After these steps are completed on all nodes, the FoundationDB cluster should be running and the nodes should be able to communicate using the shared cluster file. At this point the cluster can be initialized and configured with the desired redundancy mode using the fdbcli tool. The resulting setup provides a distributed and fault tolerant backend that can be used by higher level services such as Stalwart.
Stalwart Cluster Initialization
This chapter covers the installation and initial configuration of the Stalwart Mail Server. Stalwart is a modern mail server that supports SMTP, IMAP, JMAP, and other related services in a single application. It is designed to be easy to install and operate while still offering advanced features such as clustering and distributed storage backends. The installation process is straightforward and well suited for both small environments and larger highly available deployments.
Installation of the Stalwart Mailserver
Before starting the installation, make sure that the FoundationDB cluster is already installed and running on the system. It is important that the FoundationDB service is available during the Stalwart installation so that FoundationDB support is enabled from the beginning. This allows the mail server to later connect to the FoundationDB cluster through the web interface when configuring the backend.
The Stalwart project provides a simple installation script that downloads the required binaries and prepares the service. The following commands download the installer and run it with FoundationDB (--fdb option) support enabled. The installation path in this example is set to /opt/stalwart.
curl --proto '=https' --tlsv1.2 -sSf https://get.stalw.art/install.sh -o install.sh
sh install.sh --fdb /opt/stalwart
During installation, the script sets up the Stalwart binaries, creates the required directories, and prepares a system service so the mail server can be started automatically. Because the installation is performed with the FoundationDB option, the resulting setup already includes support for connecting to a FoundationDB cluster. This avoids the need to rebuild or reinstall the software later when enabling clustering. During the installation we can follow the progress and get our initially generated login credentials returned:
⏳ Downloading stalwart-foundationdb for x86_64-unknown-linux-gnu...
Warning: Not enforcing strong cipher suites for TLS, this is potentially less secure
Warning: Not enforcing TLS v1.2, this is potentially less secure
stalwart-foundationdb
🖥️ Creating 'stalwart' account...
✅ Configuration file written to /opt/stalwart/etc/config.toml
🔑 Your administrator account is 'admin' with password '*******'.
🔐 Setting permissions...
🚀 Starting service...
Created symlink '/etc/systemd/system/multi-user.target.wants/stalwart.service' -> '/etc/systemd/system/stalwart.service'.
🎉 Installation complete! Continue the setup at http://mx01.int.gyptazy.com:8080/login
Once the installation has finished, ensure that the Stalwart service is running and accessible. The web interface can then be used to complete the configuration. The URL and credentials are provided on stdout after the installation. Please take care, that Stalwart uses tcp/8080 by default which is not encrypted! When accessing the web interface for the first time, the backend storage can be configured and the FoundationDB cluster details can be entered. Since FoundationDB support was enabled during installation, the option to use it as a backend will be available immediately.
At this stage, the mail server is installed and ready for further configuration. The next steps typically include connecting the instance to the FoundationDB cluster, setting up domains and accounts, and preparing the system for a clustered or highly available deployment. Stalwart keeps the process simple and consistent, which makes it a practical choice for building a distributed mail infrastructure.
Configuring Stalwart for HA Clustering
After installing Stalwart with FoundationDB support and making sure the FoundationDB cluster is running, the remaining configuration steps are performed through the web interface. These steps connect the mail server instance to the distributed backend, define its identity inside the cluster, and ensure that all nodes operate consistently. When starting from scratch, the process is straightforward and only needs to be completed once per node.
When opening the web interface for the first time, the system will guide through the remaining setup. It is important that FoundationDB was available during installation so that the storage backend can be configured without reinstalling or rebuilding the service. If an older installation of Stalwart is being reused and it was originally installed without FoundationDB support, it may be necessary to create a FoundationDB store manually before continuing. In that case, a new FoundationDB store must be defined under the storage section before it can be used by the cluster. When starting fresh as described in this guide, the required store is already present and can simply be configured.
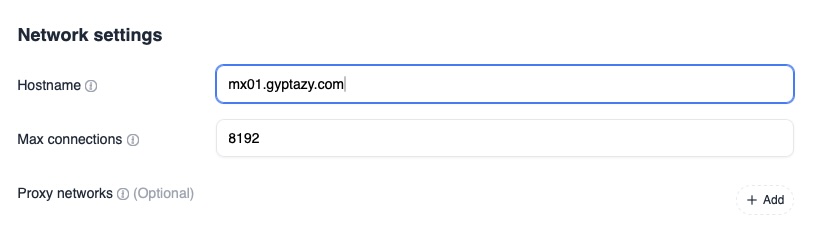
The first step inside the web interface is to define the hostname of the instance. Navigate to Settings, then Network, then Hostname. This hostname is used by the mail server for identification, for EHLO responses during SMTP sessions, and for certificate requests when using automatic certificate provisioning such as Let’s Encrypt. Each node should have a unique and valid hostname that resolves correctly in DNS.
The next step is to configure the cluster identity of the node. Navigate to Settings, then Cluster, then NodeID. Each instance in the cluster must have a unique node identifier so that it can be distinguished by the other nodes and by the backend database. This identifier is stored in FoundationDB and is used to coordinate cluster state and data placement. Make sure that every node uses a different NodeID.

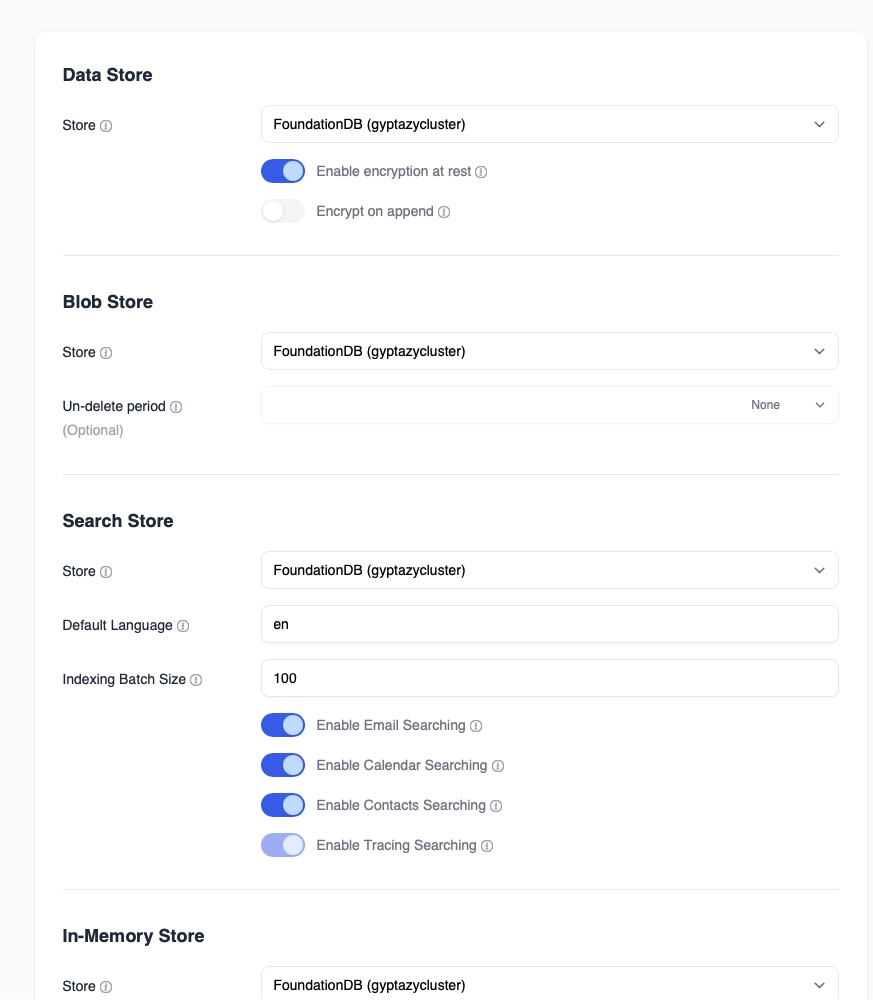
After setting the hostname and node identifier, the storage backend can be reviewed. Navigate to Settings, then Storage, then Settings. In this section, verify that FoundationDB is selected and reachable. The interface should confirm that the FoundationDB cluster file is valid and that the connection works. This section also allows enabling encryption at rest. Enabling encryption at rest ensures that stored data is encrypted before being written into the distributed backend, which adds another layer of protection for mail data.
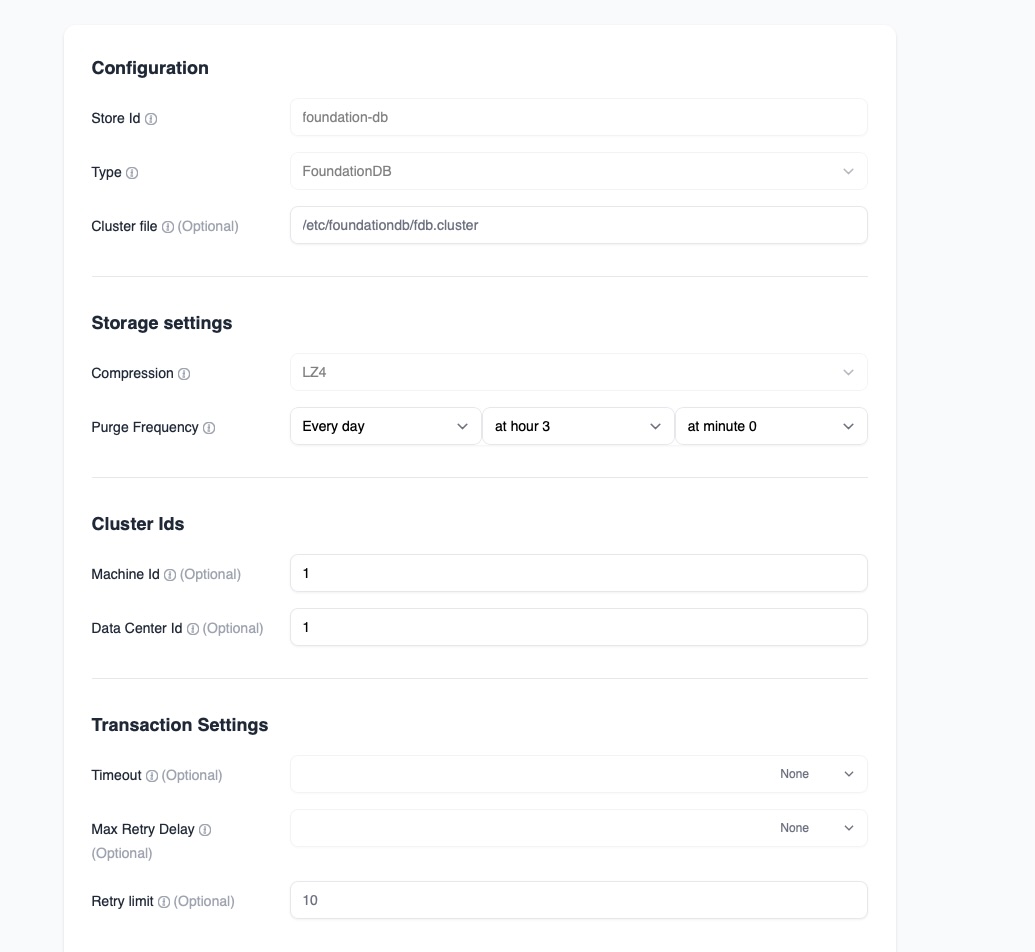
Next, the FoundationDB store itself must be adjusted for cluster use. Navigate to Settings, then Storage, then Stores, and edit the FoundationDB store. In this section, configure the machine identifier and the datacenter identifier. The machine identifier uniquely identifies the current node inside the FoundationDB topology, while the datacenter identifier helps the system understand placement and redundancy across locations. Even in small clusters, these values help maintain proper distribution and failover behavior.
Once the storage configuration is complete, basic management configuration can begin. Navigate to Management, then Domain, and add a new domain. Creating a domain initializes the mail namespace inside the distributed backend. After adding the domain, verify that it appears on all other nodes in the cluster. Because the backend is shared through FoundationDB, the domain information should replicate automatically and become visible across all instances.
At this stage, the Stalwart instances are connected to the FoundationDB cluster and share the same distributed storage. Each node knows its identity, can communicate with the backend, and can see configuration changes made by other nodes. This completes the core web interface setup required to run Stalwart as part of a highly available cluster.