NAME
gyptazy - DevOps, Coding, Networking and BSD!

OPTIONS

CONTENT
Kanidm with Proxmox and OIDC - The Full Setup (2025-09-01):
In this HowTo we install and configure Kanidm on Linux Debian Trixie and use it for authentication with Proxmox by OIDC (OpenID Connect). In previous articles, I’ve shown how to integrate Proxmox VE with external identity providers such as Authentik and Keycloak, using them as realms to centralize authentication. Both of these solutions are powerful in their own right, but sometimes you might be looking for something that is more lightweight, simple to deploy, and secure by default—without sacrificing the features you’d expect from a modern identity management system.

This is where Kanidm comes in. Kanidm is a modern, secure, and easy-to-use identity management platform built with a strong focus on simplicity and security. Its primary goal is to be a complete identity provider—meaning you shouldn’t need to run additional components like Keycloak to cover your use cases. With Kanidm, you already get everything you need in one place. Some of the standout features of Kanidm include:

  o WebAuthn (passkeys) for secure cryptographic authentication
  o OAuth2/OIDC authentication provider for web single sign-on (SSO)
  o OAuth application portal/gateway, giving users easy access to linked applications
  o Linux/UNIX integration with offline authentication support
  o SSH key distribution to Linux/UNIX systems
  o RADIUS support for network and VPN authentication
  o Read-only LDAPS gateway for legacy systems
  o Complete CLI tooling for administration tasks
  o User self-service via the WebUI

In this guide, we’ll walk through installing Kanidm on Debian Trixie, configuring it as an OpenID Connect (OIDC) provider, and integrating it as a realm in Proxmox VE. By the end, Proxmox will be able to authenticate users directly against Kanidm—giving you a streamlined, secure, and future-proof identity management setup.

Installation
Prerequisites
Before we begin setting up Kanidm, it’s important to prepare the right environment. For this guide, we’ll use a dedicated Debian Trixie (or Bookworm) instance, which can be provisioned as either a virtual machine (VM) or a Proxmox LXC container. To ensure smooth operation, the instance should have at least 6 GB of memory, as Kanidm relies on multiple services running in parallel.

In this setup, Kanidm itself will run inside Docker containers, providing isolation and easy lifecycle management. At the same time, we will install the Kanidm client tooling directly on the host system. This approach keeps administration tasks straightforward while still leveraging the benefits of containerized services.
During this setup we will use the following settings:

  o Loadbalancer:
    VHost:     idm.lab.gyptazy.com (including SSL certificate)
    ProxyPass: https://10.11.11.57 (our Kanidm VM)

  o Kanidm VM:
    IP: 10.11.11.57
    Service: tcp/443 (for OIDC)

Installing Kanidm Server & Client Tools

apt-get update
apt-get install ca-certificates curl gpg sudo

# Kanidm APT Repo
curl -s "https://kanidm.github.io/kanidm_ppa/kanidm_ppa.asc" \
    | sudo tee /etc/apt/trusted.gpg.d/kanidm_ppa.asc >/dev/null

curl -s "https://kanidm.github.io/kanidm_ppa/kanidm_ppa.list" \
    | grep $( ( . /etc/os-release && echo $VERSION_CODENAME) ) | grep stable \
    | sudo tee /etc/apt/sources.list.d/kanidm_ppa.list

# Docker APT Repo 
curl -fsSL https://download.docker.com/linux/debian/gpg -o /etc/apt/keyrings/docker.asc
echo   "deb [arch=$(dpkg --print-architecture) signed-by=/etc/apt/keyrings/docker.asc] https://download.docker.com/linux/debian \
  $(. /etc/os-release && echo "$VERSION_CODENAME") stable" |   tee /etc/apt/sources.list.d/docker.list > /dev/null

# Install Docker & Kanidm Client Tools
apt-get update
apt-get install docker-ce docker-ce-cli containerd.io docker-buildx-plugin docker-compose-plugin kanidm kanidm-unixd

# Get Kandim Server as Docker Container
docker pull docker.io/kanidm/server:latest

docker volume create kanidmd
docker create --name kanidmd \
  -p '443:8443' \
  -p '636:3636' \
  -v kanidmd:/data \
  docker.io/kanidm/server:latest

Configuring Kanidm Server
The Kanidm configuration file defines several critical parameters that directly impact security and functionality. One of the most important values is the domain, which represents the DNS domain name of your server. This setting is used in many security-sensitive contexts such as WebAuthn, and it forms the basis for security principal names (e.g., william@idm.example.com). It is crucial that this domain exactly matches your DNS hostname, as inconsistencies will break authentication flows and credential validation.

Important: Changing the domain later will invalidate existing credentials (WebAuthn keys, OAuth tokens, etc.). If it ever becomes necessary to change the domain, you must immediately run kanidmd domain rename to repair the configuration.

Additionally, the configuration specifies the origin, which is the URL of your server (including port if non-standard). This value must be consistent with the domain name you configure above. If the domain and origin do not align, Kanidm will refuse to start for security reasons. A simple configuration file could look like this:

version = "2"
bindaddress = "[::]:8443"
db_path = "/data/kanidm.db"
tls_chain = "/data/chain.pem"
tls_key = "/data/key.pem"
domain = "idm.lab.gyptazy.com"
origin = "https://idm.lab.gyptazy.com"

[online_backup]
path = "/data/kanidm/backups/"
schedule = "00 22 * * *"
# versions = 7

Afterwards, the configuration file can be copied into the persistent sotrage of the Kanidm container by running the following tasks, including starting the service by Docker:

docker cp server.toml kanidmd:/data/server.toml
docker run --rm -i -t -v kanidmd:/data \
  docker.io/kanidm/server:latest \
  kanidmd cert-generate
docker start kanidmd

After the servcie is up, we should recover / reset the passwords for the admin and idm_admin user accounts which can simply be done by running the commands:

docker exec -i -t kanidmd \
  kanidmd recover-account admin

docker exec -i -t kanidmd \
  kanidmd recover-account idm_admin

Kanidm Client Config
When running the Kanidm client on the same machine, we can now simply create a new config file in ~/.config/kanidm with the following content:

uri = "https://localhost" # The URL of the server
verify_ca = false # disables TLS certificate verification as your are using a self-signed certificate

Afterwards, we are immediately able to login as the user idm_admin by running:

kanidm login --name idm_admin

At this point, we are finnaly able to create users, groups and authentication objects.

Create Users
Once Kanidm is up and running, the next step is to create users and groups. Users can be provisioned through the CLI or WebUI, and it’s recommended to immediately enforce additional security with two-factor authentication (2FA). Kanidm supports TOTP-based tokens (such as Google Authenticator, Authy, or your preferred authenticator app), which greatly improves account protection. You can also organize accounts by creating groups, making it easier to manage permissions and access for multiple users at once. Passwords can be set or changed directly via the CLI, the WebUI, or by the user themselves through the self-service portal—ensuring flexibility while maintaining security best practices.

kanidm person create gyptazy "Max Mustermann"
kanidm person credential create-reset-token gyptazy
pass -> change password
totp -> totp creation

Create Groups
Groups in Kanidm are a powerful way to organize users and assign permissions collectively, rather than configuring access on a per-user basis. This makes it simple to manage roles, enforce consistent policies, and streamline authentication across integrated services like Proxmox. Therefore, we also prepare a group which will later be used for the Proxmox OIDC authentication with this user by simply running:

kanidm group create proxmox_group --name idm_admin
kanidm group add-members proxmox_group gyptazy --name idm_admin


Create OAuth2 Resource
Kanidm natively supports OAuth2 authorization, extended with OpenID Connect (OIDC) to add authentication on top of standard authorization flows (documentation). This makes it possible for modern applications and services to offload identity management entirely to Kanidm while relying on widely adopted open standards. By default, Kanidm issues RFC-9068 JSON Web Tokens (JWTs) that can be securely validated or introspected by resource servers to make both identity and authorization decisions. Thanks to its built-in well-known discovery endpoints, client applications can automatically fetch Kanidm’s OIDC configuration, eliminating the need for error-prone manual endpoint setup. The implementation also supports a range of standard OAuth2/OIDC features, including:

  o PKCE (Proof Key for Code Exchange) for secure authorization code flows
  o Token introspection to verify validity and scope of issued tokens
  o Token revocation to immediately invalidate access when needed

Together, these features provide a secure, interoperable, and standards-compliant OAuth2/OIDC provider that integrates seamlessly with platforms like Proxmox, enabling centralized authentication and single sign-on (SSO) out of the box. You can also find some more about this right here.

For our upcoming integration for OIDC with Proxmox as a new authentication realm, we need to create a new authentication resource, including the required application redirect url and the scopes, followed by the required secret for adding this realm to later to Proxmox. As a result, we perform the following commands:

kanidm system oauth2 create Proxmox "Proxmox Lab Env" https://virt01.lab.gyptazy.com:8006
kanidm system oauth2 add-redirect-url proxmox https://virt01.lab.gyptazy.com:8006
kanidm system oauth2 update-scope-map proxmox proxmox_group email profile openid
kanidm system oauth2 get proxmox
# Show secret
proxmox / kanidm system oauth2 show-basic-secret proxmox

At this point, we completed the required steps on the Kanidm site. The next steps will be executed on the Proxmox Node, which can be done within Proxmox's web ui or on the cli.

Proxmox: Adding New OIDC Realm
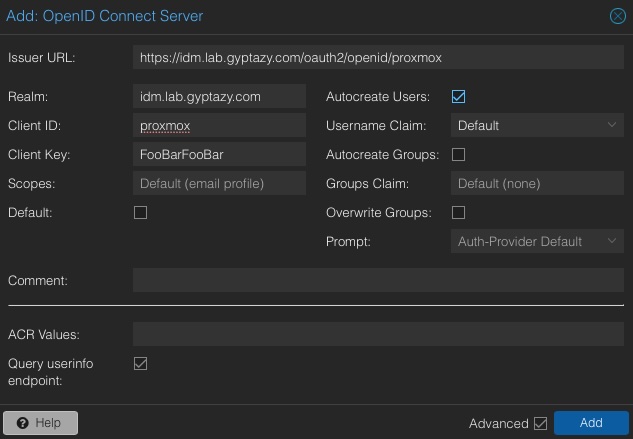
To set up a new OpenID Connect (OIDC) realm in Proxmox via the Web UI, navigate to the Datacenter view and open the Permissions section. From there, select Realms and click on the Add button. In the dialog that appears, choose OpenID Connect as the type of the new realm. You will then need to provide the realm name, which is how Proxmox will identify it internally, along with the Issuer URL, pointing to the OIDC endpoint of your identity provider. Next, enter the Client ID and Client Secret that you registered in your OIDC provider. If you want users to be automatically created in Proxmox when they log in for the first time, enable the Auto-create user option. Once all the fields are filled, confirm the addition and the new realm will appear in the list of available authentication realms. From this point, you can assign roles and permissions to users logging in via this realm, allowing seamless integration with your existing identity management setup.

Issuer URL: https://idm.lab.gyptazy.com/oauth2/openid/proxmox
Realm: idm.lab.gyptazy.com
Client ID: proxmox
Client Key: FooBar
Autocreate Users: yes

Which should look pretty similar to:
Proxmox Adding Kanidm OIDC Realm

If you prefer to do this on the cli, you can simply do this by running on any node within the cluster:

pveum realm add idm.lab.gyptazy.com \
    --type oidc \
    --issuer-url https://idm.lab.gyptazy.com/oauth2/openid/proxmox \
    --client-id proxmox \
    --client-key foobar \
    --autocreate 1

Conclusion
In conclusion, Kanidm proves that identity management can be both lightweight and straightforward, without sacrificing security or functionality. It works perfectly for real-world scenarios, showing that you don’t always need heavier solutions like Keycloak or Authentik to provide robust authentication and authorization. Kanidm also highlights the power and flexibility of open-source software, offering seamless integration across a wide range of applications. Whether you are using it with Grafana, Matrix Synapse, or, as in this example, Proxmox, Kanidm provides a complete, reliable, and versatile identity management platform that adapts to your infrastructure while keeping complexity to a minimum.