When exploring secure and efficient authentication options for a Proxmox setup, Authentik paired with OpenID Connect (OIDC) emerges as a compelling choice, particularly for those who prioritize open-source tools and in-house data control.
Authentik, an open-source identity provider, empowers administrators to customize authentication flows without the constraints of proprietary systems, avoiding escalating costs or rigid limitations.
By integrating OIDC, it enables seamless single sign-on, allowing users to access Proxmox with a single, secure login, eliminating the hassle of managing multiple credentials.
For those wary of external cloud services, Authentik’s ability to run on local servers ensures that sensitive data, such like user credentials, access logs, and more, remain fully in-house, a critical advantage for privacy and regulatory compliance.
Setting up Authentik with Proxmox is straightforward; configuring the OIDC realm with a client ID and secret delivers a robust, secure authentication layer for managing virtual machines and containers.
The open-source nature of Authentik fosters community-driven support and flexibility, letting administrators tap into shared expertise or contribute improvements while sidestepping subscription fees.
This approach offers a secure, cost-effective, and customizable solution, keeping data firmly under control and laying a strong foundation for a Proxmox environment.
Requirements
- Proxmox VE Node (or Cluster)
- Dedicated Debian 12 system to install Authentik
- Internet connectivity
Installation
Docker Installation
Authentik can be installed in different ways and one of the quickest ones results into the container image usage.
As a result, we need to have Docker and Docker Compose present on our host.
This can be installed by running the following commands:
apt-get update
apt-get install ca-certificates curl gpg wget
curl -fsSL https://download.docker.com/linux/debian/gpg -o /etc/apt/keyrings/docker.asc
echo "deb [arch=$(dpkg --print-architecture) signed-by=/etc/apt/keyrings/docker.asc] https://download.docker.com/linux/debian \
$(. /etc/os-release && echo "$VERSION_CODENAME") stable" | tee /etc/apt/sources.list.d/docker.list > /dev/null
apt-get update
apt-get install docker-ce docker-ce-cli containerd.io docker-buildx-plugin docker-compose-plugin
Afterwards, we can move over to install the required packages.
Authentik Installation
For this quick PoC we will simply use the Docker containers which are perfectly fine for dev labs, labs in general, and even smaller instances.
Therefore, we can simply proceed with the following steps:
wget https://goauthentik.io/docker-compose.yml
echo "PG_PASS=$(openssl rand -base64 36 | tr -d '\n')" >> .env
echo "AUTHENTIK_SECRET_KEY=$(openssl rand -base64 60 | tr -d '\n')" >> .env
echo "AUTHENTIK_ERROR_REPORTING__ENABLED=true" >> .env
echo "COMPOSE_PORT_HTTP=80" >> .env
echo "COMPOSE_PORT_HTTPS=443" >> .env

docker compose pull
docker compose up -d
Authentik consists of multiple containers that provide services like Redis and PostgreSQL. Depending on your network bandwidth, it might take some time to download them.
After all containers are up and running, we can start configuring Authentik.
Configuration
Authentik
After installing Authentik, it can be accessed by its default address and credentials:
URL: https://<HOSTNAME>/if/flow/initial-setup/
User: akadmin
You’re required to change the password afterwards and we can continue to configure Authentik to our needs.
Note: Depending on your initial configuration from the provided compose file, you may want to add a reverse proxy (such like nginx).
RSA Certificate
There seems to be currently a bug in Proxmox when using OIDC with Authentik if the provider is configured to use ECDSA certificates for signing and encryption.
When that happens, Proxmox fails to authenticate users and responds with a 401 error.
To work around this, we generate a new certificate using RSA instead, which Proxmox handles correctly.
When creating this RSA certificate, it’s important to include the Common Name (CN) that matches the hostname of your Authentik provider.
This is what Proxmox uses to identify and trust the certificate during authentication.
You also need to make sure the Subject Alternative Name (SAN) is set properly, which allows the certificate to cover any other domains or addresses your Authentik instance might use.
To generate the certificate, go to System → Certificates → Generate in the Proxmox web interface.
From there, select RSA as the certificate type, fill in the CN, add any SANs needed, and complete the process.
After updating the certificate and reconfiguring the OIDC settings, authentication with Authentik should start working again.
Provider & Application
To set up an application and provider in Authentik, start by logging in as an admin and opening the Admin interface.
Go to the Applications section and choose Create with Provider to create both an application and its associated provider in one step.
You can also choose to create the provider first and then link it when setting up the application.
For the application itself, give it a clear, descriptive name, optionally assign it to a group that represents its type, set the policy engine mode, and adjust any user interface settings you might need.
When it comes to selecting the provider type, choose OAuth2/OpenID Connect.
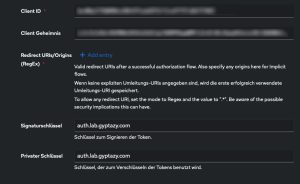
In the provider configuration, either accept the default name or enter one yourself, pick the appropriate authorization flow, and fill out the required settings.
Be sure to take note of the Client ID, Client Secret, and slug, as you’ll need those later.
Set the Strict redirect URI to https://<PROXMOX-HOST>:8006.
Now the important part: We need to define the signature and private keys to our newly generated RSA-based certificate from the previous step.
Optionally, you can set up bindings such as policies, groups, or users to control who sees or can access the application under their My applications page.
Once everything is set, click Submit to create and save the application and provider.
The configuration in Authentik is done and we now move over to the Proxmox part.
Proxmox
To integrate Authentik as an authentication source in Proxmox VE, start by logging into the Proxmox web interface with an admin account.
Navigate to Datacenter → Permissions → Realms.
Click Add and choose Realm to open the setup window.
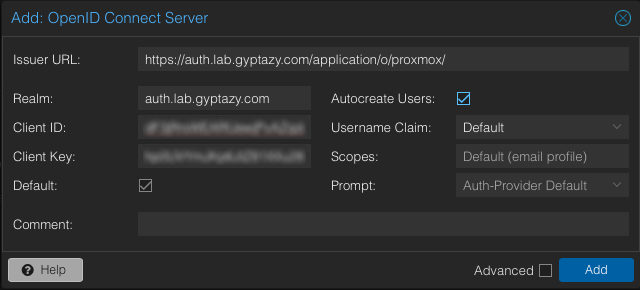
Enter the OpenID Connect details from your Authentik provider.
For the Issuer URL, copy the value from Authentik’s provider overview page, for example: https://auth.lab.gyptazy.com/application/o/proxmox/
Pick a name for the Realm, such as Proxmox OIDC.
Provide the Client ID and Client Secret from Authentik.
Set the Username claim field to username.
If you want Proxmox to automatically create users on first login, enable Autocreate users.
These users will appear as username@proxmox-oidc.
You may also set this realm as the default login method.
Save the settings to finish the integration.
Usage & Login
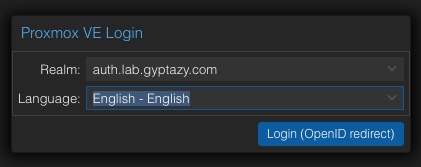
When logging into the Proxmox VE web interface, you will see an additional authentication realm.
By selecting this realm, you can log in using OpenID Connect (OIDC).
Keep in mind that you still need to adjust permissions — authentication is not authorization.