Creating a highly secure Proxmox cluster with proper micro segmentation has become one of the most frequent topics in my discussions with users and customers. Almost every organization that migrates from another virtualization platform asks the same question early on. How can network segments be defined and enforced directly inside Proxmox in a simple and centralized way? For a long time, there was no real answer to this. While Proxmox is extremely powerful and flexible, micro segmentation was never available as a native, integrated solution. Most approaches relied on external firewalls, complex network designs, or additional tooling that did not feel like a natural part of Proxmox. This is exactly the gap that my ProxWall project is intended to close. The motivation behind ProxWall reminds me strongly of the early days of my ProxLB project. Back then, many Proxmox users were searching for a real dynamic workload scheduler that could balance virtual machines across a cluster. The need was obvious, the tooling was missing, and ProxLB was created to solve that specific problem.
ProxWall Components
ProxWall is built around a clear and modular architecture that is designed to be easy to deploy, operate, and scale. The solution is composed of three main components, each with a well defined role within the overall system:
- Management Interface
- Server
- Agents
ProxWall can be deployed in multiple ways depending on the size of the environment, security requirements, and operational preferences. Installation options range from compact setups for smaller clusters to fully separated deployments for larger or security sensitive infrastructures. For this reason, it is recommended to review the installation chapter carefully before choosing a deployment model.
In this guide, we will install the ProxWall Agents on all Proxmox VE nodes in the cluster. The ProxWall Server and the ProxWall Management Interface will run together on a dedicated virtual machine. This approach keeps the control plane separate from the hypervisor nodes while still allowing tight integration with the cluster. A major advantage of this design is that the dedicated ProxWall VM can be operated as a highly available virtual machine inside the Proxmox cluster. This ensures that management and policy control remain available even in the event of a node failure, while keeping the overall architecture clean, flexible, and easy to maintain.
Installation
The installation of ProxWall is currently part of a limited testing phase and is not publicly available yet. During this phase, ProxWall is being validated in real world environments to ensure stability, performance, and seamless integration with Proxmox clusters. At the moment, ProxWall packages can only be obtained by authenticated users through the gyptazy CDN. This applies to all Debian packages as well as container images. Container images provided via the CDN must be imported into a container registry before they can be used within your environment. Please note that installation and distribution methods may change as ProxWall evolves. Native Debian repository integration and a publicly accessible container image registry are planned and may be introduced in a future release. Access to the limited testing phase is intentionally restricted. Please do not request access if you are not already participating in the test program.
ProxWall Server Installation
The ProxWall Server is the central control plane of the ProxWall architecture. It is responsible for coordinating all connected agents, distributing policies, and providing the backend for the web based management interface. For production environments, it is recommended to install the ProxWall Server on a dedicated virtual machine rather than directly on a Proxmox VE node.
Installing the ProxWall Server on a dedicated VM allows it to be operated as a highly available virtual machine within the Proxmox cluster. This ensures that management and policy control remain available even during node maintenance or hardware failures, while keeping the hypervisor layer clean and focused on workload execution.
The ProxWall Server is provided as a Debian package and can be installed using standard package management tools. The package is hosted on the gyptazy CDN and can be downloaded directly on the target system. Download and install the ProxWall Server package from the gyptazy CDN:
wget https://cdn.gyptazy.com/debian/proxwall/proxwall-server_1.1.3_amd64.deb
dpkg -i proxwall-server_1.1.3_amd64.deb
After installation, the ProxWall Server will be registered as a systemd service and started automatically. It exposes the API (default: tcp/8001) for the ProxWall agents.
The ProxWall Server configuration file is located at /etc/proxwall/proxwall_server.yml. In most environments, only minimal adjustments are required, such as defining the listen address, ports, and TLS settings. A basic example configuration is shown below:
# ProxWall Server configuration example
server:
 listen_address: 0.0.0.0
 port: 8001

tls:
 enabled: true
 certificate: /etc/proxwall/tls/server.crt
 private_key: /etc/proxwall/tls/server.key

logging:
 level: info
Once the ProxWall Server is running, it is ready to accept connections from ProxWall Agents. The next step is to install and configure the ProxWall Management Interface and the Proxwall Agents on all Proxmox VE nodes and then access the management interface to complete the initial setup.
ProxWall Management Interface Installation
The ProxWall Management Interface provides the web based frontend used to operate and manage the entire ProxWall environment. Through this interface, administrators define micro segmentation policies, manage firewall rules, monitor connected Proxmox VE nodes, and control both north south and east west traffic flows across the cluster.
In most deployments, the ProxWall Management Interface is installed together with the ProxWall Server on the same dedicated virtual machine. This keeps the control plane centralized while simplifying deployment and operational management. The management interface communicates directly with the ProxWall Server backend and does not require installation on Proxmox VE nodes. Important: Never install the server and management components on a Proxmox VE node!
The ProxWall Management Interface is also provided as a Debian package and can be installed using standard package management tools. The package is hosted on the gyptazy CDN and can be downloaded directly on the target system. Download and install the ProxWall Management Interface package from the gyptazy CDN:
wget https://cdn.gyptazy.com/debian/proxwall/proxwall-management_1.1.3_amd64.deb
dpkg -i proxwall-management_1.1.3_amd64.deb
After installation, the ProxWall Management Interface will be registered as a systemd service and started automatically. By default, the web interface listens on port 8000 and is accessible using a modern web browser. The default access URL follows this format:
https://proxwall-server01.int.gyptazy.com:8000
Configuration for the management interface is stored at /etc/proxwall/proxwall_management.yml. In most cases, only the connection parameters to the ProxWall Server instance and the bind address, and TLS configuration for the management interface must be configured. A minimal example configuration is shown below:
# ProxWall Management Interface configuration example
management:
 listen_address: 0.0.0.0
 port: 8000

server:
 hostname: proxwall-server01.int.gyptazy.com
 port: 8001
 api_token: "pw_6f3c9e2a1b4d9f0e_example_token"

tls:
 enabled: true
 certificate: /etc/proxwall/tls/server.crt
 private_key: /etc/proxwall/tls/server.key

logging:
 level: info
Once the ProxWall Management Interface is running, administrators can access the web UI, log in with the initial credentials provided by the ProxWall Server, and begin managing the ProxWall environment. But before we will focus on using the interface to create policies, manage traffic flows, and operate a micro segmented Proxmox infrastructure, we need to deploy and configure the agents on all nodes.
ProxWall Agent Installation
The ProxWall Agent is installed directly on each Proxmox VE node and is responsible for enforcing the micro segmentation policies locally on the host. Installation is intentionally kept simple and lightweight so it can be rolled out quickly across existing clusters without disrupting running workloads.
The ProxWall Agent is provided as a Debian package and can be installed using standard package management tools. The package is hosted on the gyptazy CDN and can be downloaded directly on each Proxmox VE node. Therefore, on each Proxmox VE node, download the ProxWall Agent package from the gyptazy CDN:
wget https://cdn.gyptazy.com/debian/proxwall/proxwall-agent_1.1.3_amd64.deb
dpkg -i proxwall-agent_1.1.3_amd64.deb
After installation, the ProxWall Agent will be registered as a systemd service on the Proxmox VE node. The ProxWall Agent configuration must be changed to reach the ProxWall Server and to be authenticated, as well as its own information like the node name. This can be done by editing /etc/proxwall/proxwall_agent.yml:
# ProxWall Agent configuration example
server:
 hostname: proxwall-server01.int.gyptazy.com
 port: 8001
 api_token: "pw_6f3c9e2a1b4d9f0e_example_token"

agent:
 node_name: pve-node-01
 use_system_fqdn: false

tls:
 enabled: true
 verify_certificate: true
ProxWall Management
Once all three ProxWall components have been installed and properly configured, management and day to day operation are handled entirely through the ProxWall web interface. This centralized management layer is used to define security policies, manage agents, and monitor the overall state of the ProxWall environment.
The ProxWall Management interface is exposed by the ProxWall Server and can be accessed using a modern web browser. By default, it is available at:
https://proxwall-server01.int.gyptazy.com:8000
During the initial setup, ProxWall creates a default administrative account. The initial login credentials are printed directly to the server instance during installation and first startup. The default user name is always:
proxwall-admin
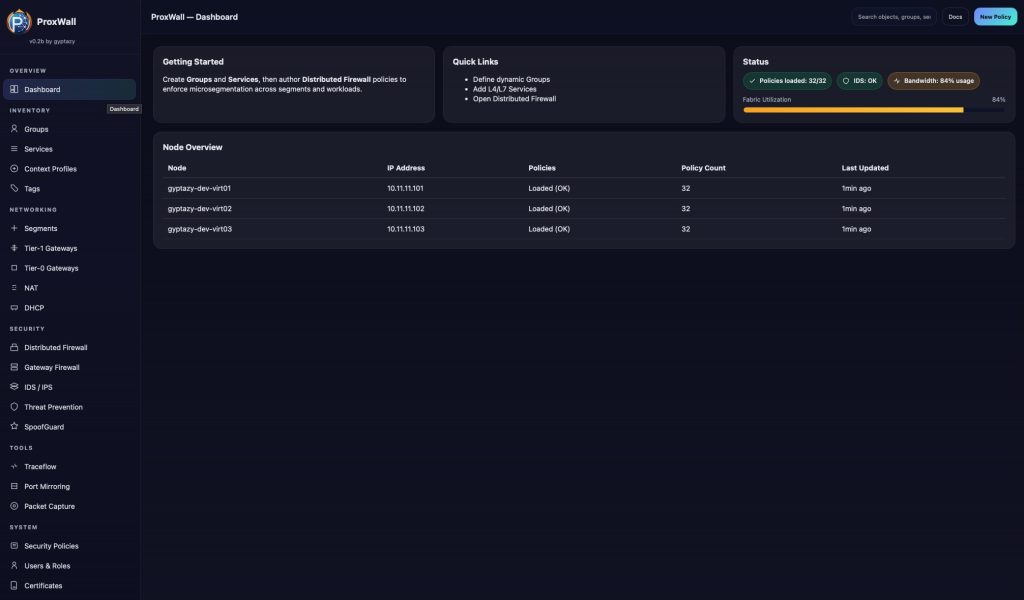
After logging in, the management interface provides an immediate overview of the environment. All connected Proxmox VE nodes are visible through their installed ProxWall Agents, allowing you to verify agent connectivity and cluster coverage at a glance. From this point on, you can begin building a fully micro segmented Proxmox infrastructure. ProxWall enables centralized control over both north south and east west traffic flows, allowing fine grained firewall rules and security policies to be applied consistently across the entire cluster. Typical use cases include isolating workloads, defining application level communication paths, restricting management access, and enforcing security boundaries directly at the hypervisor level. All rules are managed centrally and distributed automatically to the relevant agents.
After logging in for the first time, it is strongly recommended to change the initial password and review the basic system settings before creating policies or enrolling agents.
If the initial password was lost or the administrative account needs to be recovered, it can be reset directly on the ProxWall Server. To do so, run the following command on the server instance:
proxwall-server --reset-admin-account
This command resets the administrative account and prints new login credentials to the console. The web interface can then be accessed again using the default user name and the newly generated password.
In the ProxWall Management interface the policy creation, firewall configuration, traffic management, and day to day operation can now be performed. A whole feature list of ProxWall can be found in the project's overview.
Final words about ProxWall
ProxWall was designed with simplicity and seamless integration in mind. Despite addressing complex security requirements such as micro segmentation, traffic control, and centralized policy management, the actual integration into a Proxmox environment is straightforward and unobtrusive. All components follow familiar installation and configuration patterns, allowing administrators to deploy ProxWall using well known tools and workflows. Agents integrate directly with Proxmox VE nodes, while the server and management interface operate as a clean, centralized control plane without interfering with existing cluster operations.
Once installed, ProxWall blends naturally into daily administration. Policies can be defined centrally and are enforced automatically across the cluster, without requiring manual changes on individual nodes. This makes it possible to significantly improve security without adding operational complexity.
ProxWall proves that advanced network security and micro segmentation can be introduced into Proxmox environments in a practical and approachable way, making strong security architectures accessible without sacrificing clarity, control, or ease of use.