
Building Your Own PKI with Step-CA – From Root CA to Proxmox Integration with ACME

Introduction
Running your own on-prem PKI (Public Key Infrastructure) can be a game-changer and it’s not just for enterprises, but also for advanced homelabs. Whether it’s about securing internal services, managing client certificates for S/MIME email encryption, or just having full control over certificate issuance, operating your own root CA brings a lot of flexibility and independence.
There are many ways to set up a basic CA, even just using OpenSSL on the command line. But as soon as your setup grows, you’ll quickly run into limitations. Things like revoking certificates, publishing CRLs, using OCSP, or automating issuance via the ACME protocol become essential. And that’s where more powerful tools come in.
Popular solutions like FreeIPA, HashiCorp Vault, or EJBCA offer robust PKI functionality, but they can be overkill for some environments or tricky to integrate with specific workflows. One tool that’s gained a lot of traction in recent years is Step-CA, an open-source CA by Smallstep. It’s lightweight, modern, and supports ACME out-of-the-box making it a great fit for both homelab users and smaller enterprise setups.
I’ve often been asked how to simplify certificate management for Proxmox VE nodes. That’s why in this post, we’ll walk through the setup of an own root CA using Step-CA on a Debian-based system. We’ll cover the initial installation, configuration, and enabling of ACME services. Beside this, step-ca also support many other provisioner. Afterwards, we’ll issue and revoke certificates manually to get a feel for how the CA works. Finally, we’ll integrate it with a Proxmox node using the ACME protocol to make certificate renewal fully automatic.
By the end of this guide, you’ll have a fully functional PKI of your own where your nodes will be talking TLS with certificates issued straight from your own infrastructure.
Step-CA
Step-CA & Step-CLI
When working with Step-CA, you’ll quickly come across two main components: step-ca and step (often referred to as step-cli). They belong together but serve different purposes and therefore it’s important to understand when and why you need each.
step-ca is the actual certificate authority server which is the service that runs in the background, handles requests, issues certificates, checks identities, and provides features like ACME, CRLs, and OCSP. If you’re running your own PKI infrastructure, step-ca is the core component that stays online and does the heavy lifting.
On the other hand, step is the command-line tool(cli) used to interact with the CA. It’s like a Swiss Army knife for certificate management: you use it to request certificates, generate key pairs, bootstrap new CAs, create tokens, and even test ACME endpoints. Especially during setup and configuration, the CLI is essential. It simplifies a lot of the complex OpenSSL steps and makes working with certificates way more approachable.
A good example: if you’re creating a new root certificate, you’ll do that with step. Later, when a Proxmox node automatically requests a cert via ACME, it’s the step-ca server handling that request behind the scenes.
Installation on Debian
To get started with your own PKI infrastructure, the first step is setting up a clean and dedicated system where your certificate authority will run. In this guide, we’re using a Debian-based system. In general, this also works fine on any other Distribution but it’s up to you to get the packages. Within this approach, the idea is to isolate the PKI from your other services so that it remains secure, stable, and easier to manage.
Step-CA and the Step CLI are provided by Smallstep and can be installed quickly using their official packages. As said before, it consists of two packages which we’re now installing by running the following commands:
apt-get update
apt-get install -y wget
wget https://dl.step.sm/gh-release/cli/docs-ca-install/v0.23.1/step-cli_0.23.1_amd64.deb
wget https://dl.step.sm/gh-release/certificates/docs-ca-install/v0.23.1/step-ca_0.23.1_amd64.deb
dpkg -i step-cli_0.23.1_amd64.deb
dpkg -i step-ca_0.23.1_amd64.deb
During the installation you will be asked which kind of installation method you like to use:
? What deployment type would you like to configure?:
  ▸ Standalone - step-ca instance you run yourself
For our on-prem installation we use the Standalone mode. Afterwards, everything is in place and we can move over to initialize our root CA.
Initializing the Root-CA
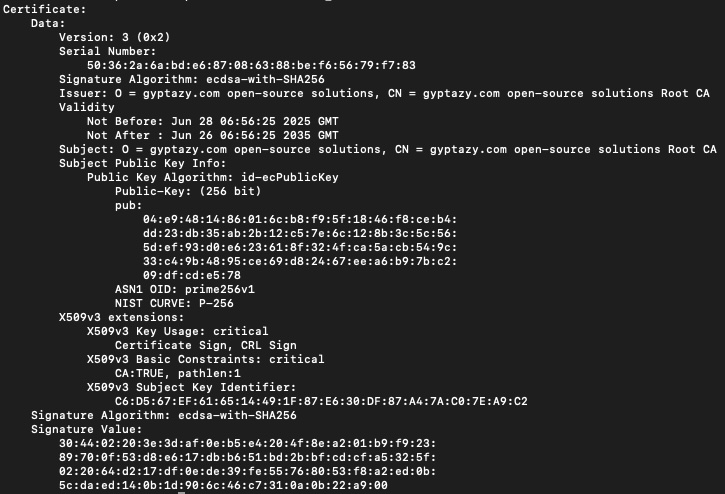
The heart of your PKI is our own Certificate Authority (CA). It’s what you’ll use to issue and sign certificates and everything that trusts your root certificate will automatically trust any certificates issued by it. That’s why setting it up cleanly and securely is so important.
To initialize your new CA, we just run the following in your terminal:
step ca initThis interactive command guides you through the setup process where you’ll be asked to enter a name for your CA (something like “gyptazy.com open-source solutions”) and define how it should be reachable (via DNS names or IPs), and choose where your root and intermediate certificates will be stored.
Important: When specifying the DNS names during setup, make sure you enter exactly how your CA will be accessed, both internally and externally. This includes hostnames like ca01.gyptazy.com for internal connections or external hostnames like ca.gyptazy.com. These values are embedded in the certificate and become critical when using ACME later. If the hostname a client connects to doesn’t match the certificate, the connection will fail and especially for systems that enforce strict TLS verification (like Proxmox or browsers).
The step ca init command will also set up your root CA and an intermediate CA. This is a good practice: the root stays offline and rarely used, while the intermediate does the actual signing work. Once the init process is finished, you’ll have a full CA hierarchy ready to go which is stored securely on your system and ready for the next step: starting the step-ca service.
Starting the Step-CA Server
While managing the CA can be done with the cli tool, the step-ca server serves the required components to fulfill the requests. Therefore, we need to start the server. In the easiest way this can also be done on the cli by running the following command:
step-ca $(step path)/config/ca.jsonAfterwards, we can validate that the service is up and running:
step ca healthNote: You might want to create a systemd unit file to start the service automatically on system start.
Adding ACME Support to Step-CA
ACME is a great protocol when it comes to certificate management — it automates the entire process of requesting, issuing, and renewing certificates. No more manual steps, no more copying keys around. Plus, it’s already widely supported by many systems, including Proxmox, making it a natural fit for automating TLS in your environment.
Enabling ACME in Step-CA is as simple as running a single command:
step ca provisioner add acme --type ACMEThat’s it! You just need to restart your step-ca server and your CA now speaks ACME.
If you want to fine-tune how long issued certificates should be valid, you can customize the X.509 duration settings for the ACME provisioner. For example:
step ca provisioner update acme \
   --x509-min-dur=20m \
   --x509-max-dur=72h \
   --x509-default-dur=36h
This lets you control things like how often clients should renew their certificates, which can be useful depending on your environment and security requirements. Once the provisioner is active and configured, your CA is fully ready to serve ACME requests – including those coming from your Proxmox nodes which we’ll cover later.
Basic Certificate Management
Even though we’re focusing on using ACME for automation, there are still plenty of cases where you want to manually issue a certificate, for example, for testing your CA setup, securing a one-off service, or integrating with systems that don’t support ACME
Create Certificates
With step-cli, generating a certificate is quick and straightforward. Here’s how you can issue a cert for test01.gyptazy.com directly from the command line:
step ca certificate test01.gyptazy.com test01.crt test01.keyThis command does a few things:
- Requests a certificate from your Step-CA for the hostname
test01.gyptazy.com - Stores the signed certificate in
test01.crt - Saves the corresponding private key in
test01.key
You’ll be prompted for your CA’s password or token (depending on how your provisioner is configured), and the CLI will handle the rest.
If needed, you can also add flags like –provisioner to specify which provisioner to use, or –not-after and –san if you want to tweak expiry or add Subject Alternative Names.
This approach is handy when setting up new services or debugging your PKI flow and it’s a great way to get familiar with how Step-CA works under the hood.
Revoke Certificates
Sometimes certificates need to be revoked. Maybe a private key was compromised, the server is no longer in use, or you’re just cleaning up old entries. With Step-CA, revoking a certificate is just as straightforward as issuing one.
To revoke a certificate, all you need is its serial number or the certificate file itself. Here’s how you can do it using step-cli:
# Certificate File
step ca revoke --crt test01.crt
# Certificate Serial
step ca revoke --serial <serial-number>
This will contact your CA and mark the certificate as revoked. If the certificate is actively used and clients check CRLs or OCSP, they’ll know to no longer trust it.
During this, you’ll be asked for authorization (e.g., your provisioner password or token), and once confirmed, the CA will update its revocation list. Keep in mind: revoking is an essential part of certificate lifecycle management.
Proxmox using Step-CA with ACME
Of course, we could take the old-school route: generate a certificate manually using step-cli, then copy the certificate, private key, and intermediate CA over to the Proxmox node and drop them into the right folders. That works and it’s totally valid for static environments but it’s also a bit outdated and not really scalable, especially when certificates need to be rotated or updated regularly.
Instead, we want to make use of what’s already supported by Proxmox: ACME. By using the ACME protocol, we can automate the whole certificate lifecycle: from request and issuance to renewal without having to log into the server every time something expires.
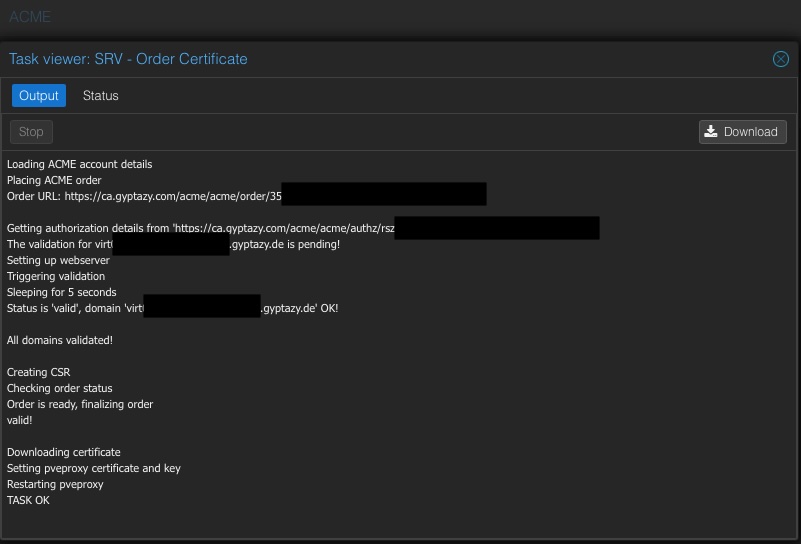
To achieve that, we need to tell Proxmox to stop using Let’s Encrypt and instead talk to our own ACME server, which is powered by Step-CA. This means we’re hosting the full PKI stack, including the ACME endpoint, and Proxmox can now securely fetch signed certificates directly from our infrastructure.
Once the ACME directory URL of our Step-CA is configured on the Proxmox node, everything else works just like before – only this time with full control, better integration into our environment, and no dependency on external services.
Configure Custom ACME Provider in Proxmox
By default, Proxmox supports ACME via Let’s Encrypt, but the cool part is: you can easily use your own ACME-compatible CA like the one we’ve just set up with Step-CA. This gives you full control over certificate issuance, avoids external dependencies, and fits perfectly into your internal infrastructure.
To tell Proxmox to use your own ACME provider, you just need to run a single command on the CLI of your Proxmox node:
pvenode acme account register default contact@gyptazy.com --directory https://ca.gyptazy.com/acme/acme/directoryReplace the URL with your actual Step-CA instance and make sure the hostname matches the one you configured during the CA setup, including proper DNS resolution and HTTPS access (since ACME requires TLS).
Once this is registered, your Proxmox node will know how to communicate with your own CA. From here, requesting a certificate is as simple as going into the Proxmox web interface, selecting your node, and using the ACME tab to issue a certificate. It’s just like you would do with Let’s Encrypt.
The big advantage: you’re no longer dependent on any external CA and can fully control who gets a certificate, how long it’s valid, and what trust anchors are involved. The best? It’s all from your own infrastructure.
Note: Keep in mind that this needs to be done on all nodes in the cluster. This can easily be done with cfg-mgmt like Ansible.
Conclusion
Running your own PKI with Step-CA gives you full control over certificate management. From manually issuing and revoking certificates to fully automating the process using the ACME protocol. With ACME support enabled, modern systems like Proxmox can automatically request and renew certificates just like they would with Let’s Encrypt but within your own trusted infrastructure.
This setup is not only ideal for enterprise environments that need strict internal security and compliance, but it’s also a powerful solution for homelab enthusiasts who want to avoid external dependencies and build a reliable, self-contained ecosystem. And just like this post showcases, it’s not too difficult to set up and maintain. A step closer to a secure and de-centralized environment!