
Proxmox 9 (PVE) Beta 1 – A First Look
Table of Content
What topics will be covered in this blog post about Proxmox 9.
- Introduction
- Block Storage (iSCSI, Fibre-Channel) & Snapshots
- SDN Fabrics including OSPF
- Dynamic Load Balancing in HA
- Import Disks for VMs within the Web UI
- Dedicated Replication Network
- Upgrade from Proxmox 8 to Proxmox 9
Introduction
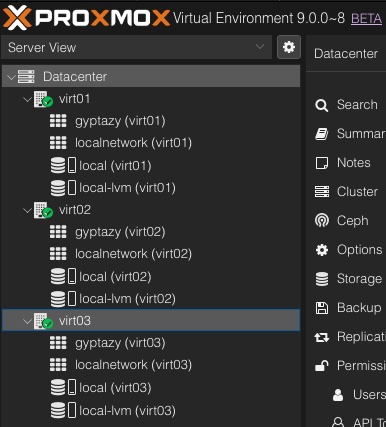
Proxmox VE 9 Beta 1 has just been released and marks a significant milestone as it’s now based on the upcoming Debian 13 “Trixie.” This major upgrade brings a modernized foundation while continuing the trusted stability and features of previous versions. One of the standout improvements in this release is the introduction of VM snapshot support for thick-provisioned LVM storage, a feature that’s now available as a technology preview. With a new storage property enabled, snapshots can persist the current disk state under a named volume and spin up a new one from that snapshot which is particularly useful for setups using shared LVM storage, such as LUNs provided via iSCSI or Fibre Channel.
Upgrading from Proxmox VE 8.4 is designed to be seamless, allowing existing users to transition smoothly to the new version. Another powerful addition is the expansion of the software-defined networking (SDN) stack with the concept of fabrics. These routed networks connect Proxmox nodes into OpenFabric or OSPF-based topologies. This new functionality lays the groundwork for building full-mesh Ceph clusters or serving as an efficient underlay for VPNs, giving administrators much more flexibility and control over complex networking setups. Also the HA manager will be extended for a dynamic load balancing service such like ProxLB within the roadmap. Therefore, let’s have a look at the current situation within the first beta version of Proxmox 9.
Block Storage (iSCSI, Fibre-Channel) & Snapshots
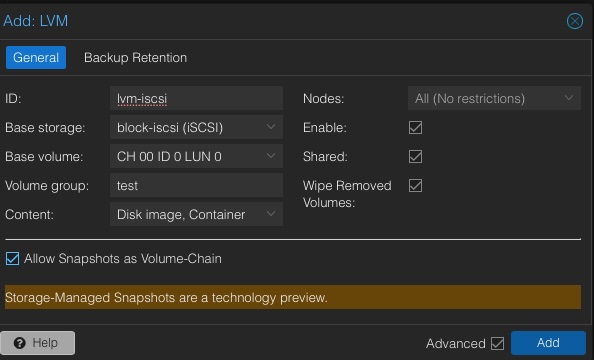
Proxmox VE 9 introduces the long awaited support for virtual machine snapshots on block-based storage backends, including iSCSI, Fibre Channel, and NVMe over Fabrics (NVMeoF), when combined with LVM-Thin or LVM-Thick volumes.
Until now, creating snapshots for VMs on block storage was only possible with file-based storage or through workarounds. With this release, Proxmox officially supports snapshotting when using LVM (Logical Volume Manager), particularly LVM-Thick, on top of block devices. This unlocks new flexibility for users relying on SAN or enterprise storage systems.
While LVM-Thick itself doesn’t inherently offer thin provisioning, thin provisioning is still possible if your underlying storage array supports it. For example, NetApp storage systems can provide efficient thin provisioning and deduplication via their storage efficiency features. In such scenarios, even with LVM-Thick, the backend handles storage savings transparently, so you benefit from snapshots and thin provisioning without compromising performance or flexibility.
This new capability is especially beneficial for environments that require:
- Enterprise-grade SAN storage performance
- Consistent snapshot functionality across all storage types
- Integration with storage arrays that offer hardware-level features
With this update, Proxmox takes another step toward offering a consistent and powerful virtualization experience across diverse and high-performance storage backends.
SDN Fabrics including OSPF
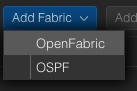
The Software-Defined Networking (SDN) stack has taken a major leap forward by introducing the concept of Fabrics. Fabrics represent routed networks made up of interconnected Proxmox nodes, designed to support more dynamic and scalable networking topologies within the virtual environment. This addition brings more advanced routing capabilities directly into Proxmox without relying on external appliances or complex manual configurations.
A major enhancement is the support for OpenFabric and OSPF (Open Shortest Path First) within the SDN stack. OpenFabric allows for simple creation of routed peer-to-peer topologies between nodes, while OSPF brings a well-established dynamic routing protocol into the mix. With OSPF, Proxmox nodes can automatically discover and manage network routes, ensuring optimal traffic flow and redundancy across the infrastructure.
These fabrics are particularly useful in high-availability and high-performance environments. For example, in a full-mesh Ceph cluster, fabrics ensure that storage nodes remain efficiently connected even as the topology grows. Similarly, fabrics can act as an underlay network for VPNs, enabling the deployment of secure, isolated virtual networks across multiple physical locations or Proxmox clusters.
By integrating these features directly into the platform, Proxmox VE empowers administrators to design and manage complex network setups natively, with a strong focus on scalability, resilience, and ease of use. Whether you’re building out a distributed storage backend or setting up multi-site connectivity, fabrics and OSPF in SDN bring enterprise-grade networking tools to your fingertips.
Dynamic Load Balancing in HA

While native load balancing is still on the roadmap and not yet implemented in Proxmox VE 9, it’s a highly anticipated feature that many users are keeping an eye on. The Proxmox team has acknowledged the demand for intelligent workload distribution across clusters, but as of the Beta 1 release, load balancing remains a planned and yet an unconfirmed feature for the final release. It’s important to note that being on the roadmap does not guarantee it will make it into the Proxmox VE 9 stable version.
Fortunately, users don’t have to wait idly. There is already a promising and practical open-source alternative available: ProxLB. This community-driven project offers a load balancing solution that integrates well with current Proxmox environments, including both Proxmox VE 8 and the newly released VE 9 Beta. ProxLB enables administrators to automate the distribution of virtual machines based on configurable rules such as resource utilization, node load, and custom tags.
Because ProxLB works independently of the core Proxmox codebase, it’s expected to remain compatible with future versions; including the final release of Proxmox VE 9. This makes it a reliable option for anyone looking to implement load balancing functionality today without having to wait for native support from Proxmox.
Import Disks for VMs within the Web UI
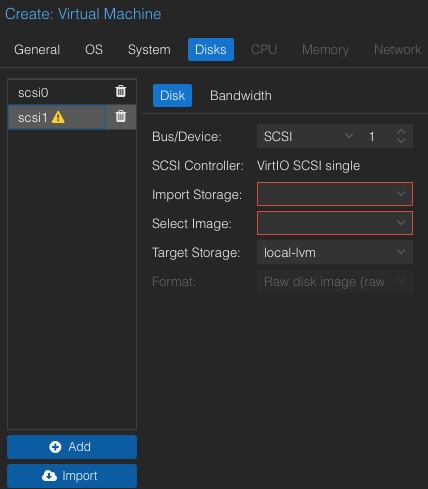
Also importing virtual machine disks from external sources has become significantly more streamlined thanks to the enhanced Web UI. When creating a new virtual machine, you now have the option to import existing VM disks directly as part of the setup process. This is particularly helpful for users migrating from other virtualization platforms such as VMware, making the transition faster and more intuitive without requiring complex CLI operations or additional tooling.
The feature supports various storage backends, but combining it with a network file system like NFS makes the process even more efficient. NFSv4 is especially recommended due to its performance benefits and improved security features over earlier versions. When paired with an NFS share mounted in Proxmox, importing a disk image is as simple as selecting it during VM creation, specifying the target storage, and letting Proxmox handle the rest. This improvement not only simplifies migration but also lowers the technical barrier for new users. Whether you’re consolidating infrastructure or gradually phasing out legacy systems, the ability to import disks from the Web UI enhances flexibility and saves valuable time. It’s another step toward making Proxmox a powerful yet accessible solution for enterprise and home lab environments alike.
Dedicated Replication Network

With Proxmox VE 9, you can now define a dedicated replication network, just like the existing migration network. This is especially useful when using ZFS replication, as it keeps the replication traffic separate from the main network. Before, you had to configure this manually via the CLI, but now it can be done easily in the web interface or API. This makes the setup cleaner, avoids network congestion, and improves overall handling without involving further manual tweaks.
Upgrade from Proxmox 8 to Proxmox 9
Upgrading from Proxmox VE 8 to Proxmox VE 9 is a straightforward process, thanks to the robust tooling and practices already established by the Proxmox team. Like previous major upgrades, Proxmox continues to build on Debian, and with Proxmox VE 9 now based on Debian 13 “Trixie”, the heart of the upgrade is a standard APT-based dist-upgrade.
If you’re already familiar with the process of migrating from one Debian release to another, you’ll find yourself right at home. Even if not, the tools and documentation provided make this upgrade process easy and reliable – let’s have a look at it:
# Upgrade to latest Proxmox 8.4 packages
apt update && apt dist-upgrade
# Run checklist script for PMX 9 upgrade
pve8to9 --full
# Change Debian Repositories to Trixie
sed -i 's/bookworm/trixie/g' /etc/apt/sources.list
sed -i 's/bookworm/trixie/g' /etc/apt/sources.list.d/pve-enterprise.list

## This step is only required during the PMX9 Beta
cat > /etc/apt/sources.list.d/proxmox.sources << EOF
Types: deb
URIs: http://download.proxmox.com/debian/pve
Suites: trixie
Components: pve-test
Signed-By: /usr/share/keyrings/proxmox-archive-keyring.gpg
EOF

# Update repositories and start the upgrade to PMX9
apt update
apt dist-upgrade